Making Member-Only Pages


Last updated Oct 27th, 2020 | Page history | Improve this page | Report an issue
Support the team building MODX with a monthly donation.
The budget raised through OpenCollective is transparent, including payouts, and any contributor can apply to be paid for their work on MODX.
Backers


Budget
$248 per month—let's make that $500!
Learn moreIntroduction
MODX Revolution uses a whole new set of security systems to allow you more flexibility while giving your users access (or denying) to Manager and Web resources. As there seems to be need for a proper tutorial to get you into the basics of working with this advanced system this document has been written.
It's common to have pages in the front end of a site that can only be seen by certain users. This tutorial describes how to do that in MODX Revolution. It assumes that you already know how to let users register and log in using the components in the Login package. The process described below will have no effect on which resources users can see or edit in the MODX Manager.
For those that are savvy enough, below follows a simple list to help you through the maze or to remind you how it works. If you need more information and would like some examples, scroll down to the related subsection below.
- Create a Resource Group (Security -> Resource Groups -> Create Resource Group)
- Link your member-only resource to the Resource Group. (By editing the resource, or by dragging them from the resource tree to the right)
- Create a User Group (Security -> Access Controls -> User Groups -> New User Group)
- Add a resource group entry on the Resource Group Access tab (context: web, minimum role: Member (9999), access policy: Resource)
- Add users to the user group with the role of Member. (Security -> Manage Users)
- Flush permissions (Security -> Flush Permissions) and try it in another browser (not just another browser window: another browser)
Access Wizard explanation (2.2.2 and later)
MODX 2.2.2 ships with an access wizard that simplifies this process. The step-by-step explanation is still valid, but the access wizard simplifies the process. You may wish to read both explanations to gain a better understanding of how each aspect of MODX's security system interacts.
1. Create a Resource Group
Go to Security -> Resouce Groups and click the Create Resource Group. A window similar to this should pop up: 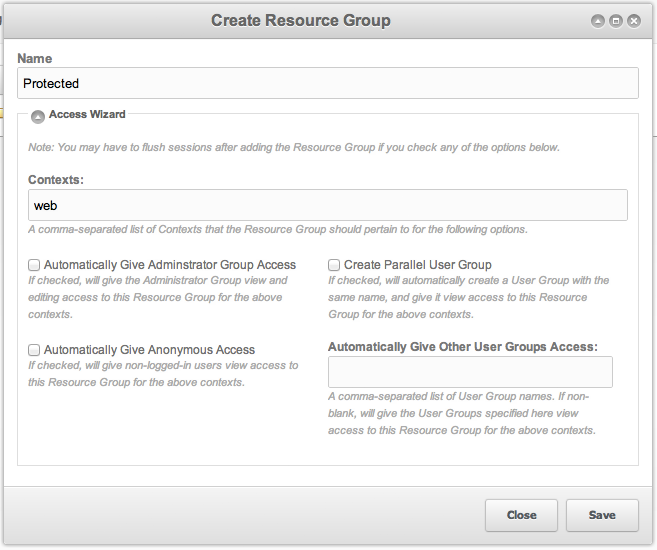
Let's go over each section:
| Section | Explanation | Tutorial Default |
|---|---|---|
| Name | This is the name of the resource group that we're generating. Make it descriptive and easy-to-remember. | Protected |
| Contexts | This is the context where you want the rules to apply. For this tutorial, we only have one context, "web", and we only want to hide things there. | web |
| Automatically give Administrator Group Access | Checking this box will give all users in the default administrator group access to the resource group. As of 2.2.1, the default admin user is marked as a "sudo" user and they can view all resource groups, regardless of whether the administrator group has access. However, if there are any other administrators that don't have sudo access and we want them to be able to view the resources in the resource group, we should check that box. | checked |
| Automatically give Anonymous Group Access | Checking this box will give all users in the anonymous user group access to the resource group. When someone comes to your website and they're not logged into anywhere, they're considered in the anonymous user group. We want to protect our pages from users who aren't logged in, so let's leave this box unchecked for this tutorial. | unchecked |
| Create Parallel User Group | You may not wish to have everyone who can view the member-only pages be in the administrator group (if you've checked the "Automatically give Administrator Group Access" option). In this case, you can create another user group that has access to the resources in this resource group. Let's check that, as our members aren't administrators. | checked |
| Automatically Give Other User Groups Access | If you have any other user groups that you've defined previously to this tutorial to whom you want to give access, you can list them here. |
Great! We have a resource group and a user group created. We now need to add resources to the resource group and users to that user group and then we'll be laughing.
2. Add Resources to the Resource Group
We need to tell MODX with resource we want to protect. Let's stay on the same page from Step 1 (Security > Resource Groups). On the right, open up the web context to see all the pages on your site. Drag them from the column on the right into your resource group. Easy, right? An alternative is to go into each resource, go to the Resource Groups tab, and check the checkbox under the "Acces" column and the "Protected" row.
3. Add Users to the User Group
Okay, we've had enough of the Resource Group page. Go to Security > Access Controls. In the Users Groups tab, we can see a list of all of the user groups on our site. Right click on the "Protected" User group. Select "Add User to Group". For the "Name", select the user you want in the user group. For the Role, let's select "Member" for now. Roles define what an individual user can do within a user group, but we don't need that fine of control for this tutorial. Click Save.
It is important to realize that as soon as you have protected a resource by (1) assigning it to one or more resource groups and (2) linking the resource group to a user group using an access control, those pages will no longer show up for users that are not linked to the resource group. The default behavior in that case is displaying the 404-error page. If you would rather return the 401-error, you will need to give the anonymous user group "load" permission for the resource group. More about this in a later tutorial. At this moment in the tutorial, your page will not be visible as you have not yet added it to a user group.
We now have our resources in a resource group, and users in a user group. Done? Sorry, we have a few small things to do first. If you're following this tutorial and this is your first foray into MODX security, you will likely run into a small but important snag: the user group we created doesn't have context access to our front end context, web. In other words, if we could view that context, we could view those protected resources -- but we can't currently view that context. Let's give our user group permission to view that context.
4. Add Context Access to the User Group
Go to Security > Access Controls. Right click on the protected user group. Select "Update user group". Go to the Context Access tab. Click "Add Context". We are presented with a dialog such as the one below. Let's break it down: 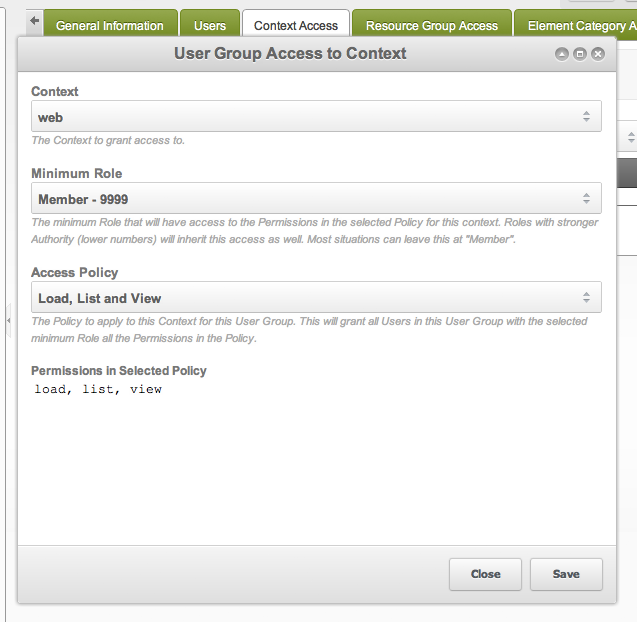
| Section | Explanation | Tutorial Default |
|---|---|---|
| Context | This specifies to which context we're giving access. The basic use case will have web and mgr. Web is the public front-end of your website, and mgr is the private back-end of your website (i.e., the manager that you're logged in). | web |
| Minimum Role | This specifies what user roles this rule will apply to. If we want all users in this user group, select "Member - 9999". This is where some of that fine control comes in that we talked about earlier. | Member - 9999 |
| Access Policy | This specifies what permissions we're giving to the users. Different policies will allow user groups to do different things. | Administrator |
Let's make one rule with "web", "Member - 9999", and "Load, List and View". If we want users to be able to view the MODX manager, we can add a second rule to give them access to the mgr context: "mgr", "Member - 9999", and "Administrator". All these users will have admin access. If you would prefer to limit their permissions, you could instead choose "Content Editor" or "Developer" for their access policies. Alternatively, you can make your own in Security > Access Policies if you want to be specific about what users can or can't do.
We now have users in a user group, resources in a resource group, and that user group can view the context. We're so close!
5. Flush Permissions
Before you can see a change, you need to reset / flush what your individual users can see and do. Go to Security > Flush Permissions. To test this in the front end, you must use a different browser. 90% of your grief will come from not testing in a different browser or flushing your permissions, so don't be lazy and open that second browser up. Congratulations, you now have members-only pages!
In some cases you may need to clear the site cache, specifically for the mgr (manager) context as elements and resources may cache their permissions.
Step-by-step explanation (pre-2.2.2)
If you're not quite as savvy, or would rather also know what happens when you set a certain permission or make an access entry, you might find this section interesting. As of 2.2.2, MODX ships with an Access Wizard and you might wish to start with that.
1. Create a Resource Group
A Resource Group is a collection of resources which you can link to user groups and access list entries. When you have created a resource group, you can easily classify pages to be only visible for certain user groups, or roles within user groups.
To create a resource group, navigate to Security -> Resource Groups and click on the Create Resource Group button. In the popup you are prompted to enter a name for the resource group. In the tutorial we expect you named it "Protected".
2. Link your member-only resource to the Resource Group
Now that you have a resource group, you should add resources to it. There are two ways to achieve this.
First of all, you can go to Security -> Resource Groups and drag resources from the right resource tree to the left resource groups ("Protected"). The second option is editing your resource, and ticking the right box on the "Access Permissions" tab.
3. Create a User Group
You have a resource group with resource applied to them, now you'll need to decide who will be able to view the resources. For this, we'll make a new user group.
To do this, go to Security -> Access Controls. On the (default) User Groups tab, click on the New User Group button. Choose a name for the group, and submit the form.
4. Add Resource Group access
Move on to the "Resource Group Access" tab. This tab defines the resource groups your user group has access to. Three out of four fields are similar to the Context Access groups, namely the Context, Minimum Role and Access Policy. A new one is Resource Group which, as you probably guessed, defines the resource group the user group can access.
The settings:
- Resource Group: whatever you named it, for example "Protected"
- Context: web
- Minimum role: Member (9999)
- Access Policy: Resource
It is important to realize that as soon as you have protected a resource by (1) assigning it to one or more resource groups and (2) linking the resource group to a user group using an access control, those pages will no longer show up for users that are not linked to the resource group. The default behavior in that case is displaying the 404-error page. If you would rather return the 401-error, you will need to give the anonymous user group "load" permission for the resource group. More about this in a later tutorial. At this moment in the tutorial, your page will not be visible as you have not yet added it to a user group.
5. Add users to the user group
Now add some users to the user group. You can do this by editing the user, or by going back to the Users tab and adding them from there. It will ask for the User Group, as well as the Role. As we assumed the Member role with an authority of 9999, you can simply use that one.
When using a websignup snippet, make sure it automatically puts them in the right user group.
6. Flush permissions
Now that all settings are done, you will need to flush permissions (Security -> Flush Permissions) before you will see an effect. Also make sure that, if you go to test it front-end, you use a different browser all together. Don't use a different tab or browser window, as it will still use your Manager login to check for permissions.
Please note that in some cases it is also necessary to clear the site cache, specifically for the mgr (manager) context, as elements and resources may cache their permissions.
Still can't get it to work?
Make sure you followed everything step by step and that you flushed permissions properly. If everything seems to be alright, check again and then go to the Forums to ask for help. If you think the tutorial is misleading or inaccurate, please visit the forum topic (linked below) and post about what is incorrect so it can be fixed.
See Also
Bob's permissions guide: http://bobsguides.com/revolution-permissions.html
Forum topic discussing this tutorial: https://forums.modx.com/index.php/topic,51259.0.html
Using the Login Snippet to set up a basic "Members Only" area: Login.Basic Setup
Security: Security
Support the team building MODX with a monthly donation.
The budget raised through OpenCollective is transparent, including payouts, and any contributor can apply to be paid for their work on MODX.
Backers
Budget
$248 per month—let's make that $500!
Learn more