Developing an Extra, Part II


Last updated Mar 6th, 2021 | Page history | Improve this page | Report an issue
Support the team building MODX with a monthly donation.
The budget raised through OpenCollective is transparent, including payouts, and any contributor can apply to be paid for their work on MODX.
Backers


Budget
$248 per month—let's make that $500!
Learn moreThis tutorial is part of a Series:
- Part I: Getting Started and Creating the Doodles Snippet
- Part II: Creating our Custom Manager Page
- Part III: Packaging Our Extra
This section will cover creating the Custom Manager Page (CMP) for our Doodles Extra we created in step 1. This includes explaining controllers/connectors/processors, making our Namespace, Action and Menu item, and working with ExtJS to create the UI.
First Setup Steps
We've got our snippet and our basic directory structure. Now we need to setup a few things before we can start developing our Custom Manager Page. The first is our Namespace.
Namespaces
Namespaces in MODX Revolution are basically silos of development in the system. They load the base path for your CMP, and allow MODX to know where to grab the files for it and for Lexicon files (i18n). They allow you to develop and run your Extras without having to modify core MODX files or get in the way of Git/SVN deployments of MODX.
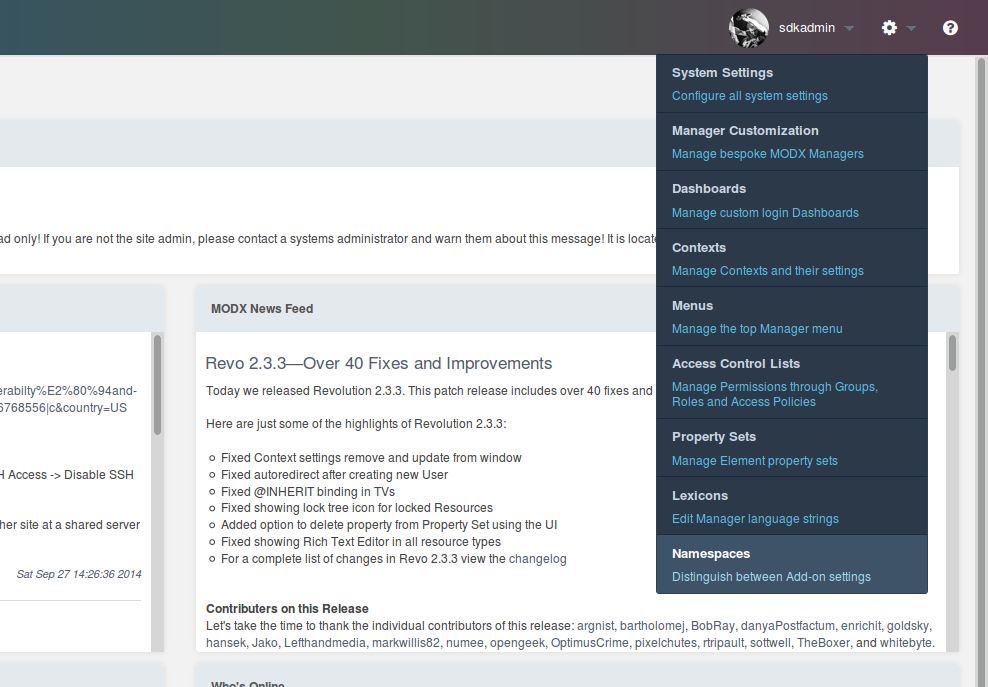
We'll want to create ours. Go ahead and click on the Namespaces submenu item in the System menu represented by the “cog” icon:
From there, go ahead and click the 'Create New' button above the grid to load a Create Namespace window. Input these values into the form:
- Name - doodles
-
Core Path - the full absolute path to your
core/components/doodles/directory. If you placed your files within the MODX root, you can use{core_path}components/doodles/as a shortcut. -
Assets Path - the full absolute path to your
assets/components/doodles/directory, or{assets_path}components/doodles/if you placed that within the MODX root.
Let's explain. This gives us a Namespace key of 'doodles', which we can reference our Namespace with. Secondly, we're pointing the path to our doodles core directory that we've been developing in. This tells MODX to load the controller files that load the CMP (more on that in a sec) from that directory, which is what we want. Because that's where we'll be installing the files with the Transport Package. However, setting it to an absolute path in our environment allows us to develop it outside of the MODX webroot.
The core path tells MODX where to look for the lexicon and controller files. The assets path is not currently used by the MODX core.
Now go to the System Settings, and edit the two settings you added for doodles.core_path and doodles.assets_url. Set their Namespace to 'doodles'.
Actions and Menus
Next, we'll need to create our menu item for the CMP; this includes creating an “Action”. What is an Action in MODX? Well, it's basically an abstract representation of a Manager page. Each MODX manager page has an Action in the modx_actions table, which can be referenced. This allows you to create any number of "Actions" that can be used as CMPs in the manager.
Previous to MODX 2.3, actions were differentiated only by an integer and you would need to call that action number with a menu item to load your CMP. Now CMPs can be loaded with our Namespace and the name of our PHP controller file without needing to look up the action number in the database.
So if we name our controller index.class.php, our action can be called with index. Or if we name our controller home.class.php, our action can be called with home.
In our case, we've already created a namespace called “doodles” and later when we create our controller file, we'll call it index.class.php. So, in MODX 2.3 our CMP can be called with:
http://your-web-root/manager/ ?a=index&namespace=doodles
Before MODX 2.3, if we gave our CMP an Action number of 2, then our CMP would be called with:
http://your-web-root/manager/ ?a=2
More information on the new way of creating CMPs in 2.3 can be found here:
We will now go ahead and create the menu item that creates the URL to load our CMP.
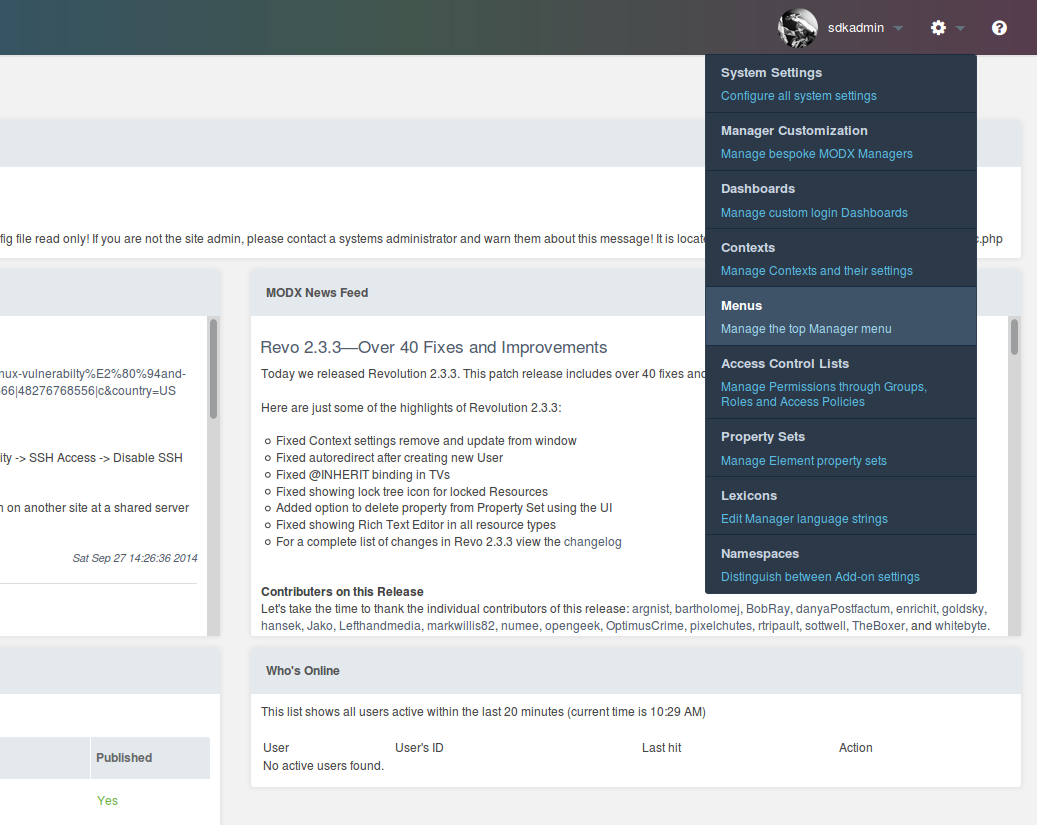
Go back to the System menu and select the menu item called Menus.
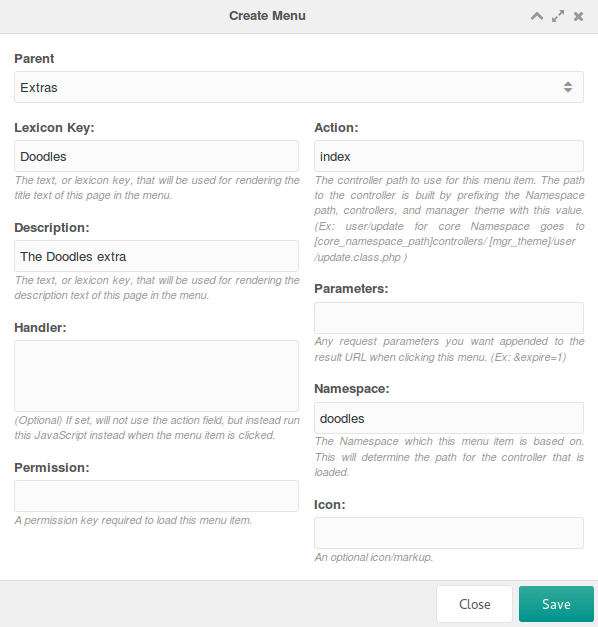
You'll be presented with the following screen. Click on the Create Menu button above the menu tree.

In the Create Menu window that appears, there are a few fields to fill out.
- Parent - Extras
- Lexicon Key - Doodles
- Description - The Doodles Extra
- Handler -
- Permission -
- Action - index
- Parameters -
- Namespace - doodles
- Icon -
And let's explain each field:
Parent: The menu item we want our Extra to be listed under. The standard is under "Extras".
Lexicon Key: This is the lexicon key for the menu item. Since MODX allows you to view the manager in a multiple number of languages, MODX provides us the option to load a Lexicon string (in our lexicon topic we said to load for the action earlier, doodles:default) to translate this with. For now we'll just directly give it a name but you can change it to a Lexicon string later.
Description: Similar to the first field, this allows us to provide either a straight up description, or a lexicon key to be translated.
Handler - This allows you to run JavaScript instead of loading a page when running a menu item. It's useful for menu items that don't actually load a page but do things, such as the "Clear Cache" menu item under the Site menu. We'll skip this.
Permissions - Here you can specify a MODX Permission that MODX will check to see if the user has when loading the menu. If the user doesn't have this Permission, this menu item won't load. We don't want to restrict our CMP, so we'll leave this blank.
Action - This tells MODX what action to load when the Menu item is clicked.This is the name of our controller file. Call it 'index'.
Parameters - This allows you to attach GET parameters to the menu item when clicked. We don't need this, so we'll skip it.
Namespace - We will use the doodles namespace we set up earlier.
Icon - If you wish, you can add an icon here to be used by your menu item.
Click Save and you'll see your menu item added to the tree under 'Extras'.
Lexicons
Lexicons in MODX Revolution allow you to provide MODX with translations for your Extra (and anything, really) in any language. We want our Extra to be i18n-compatible, so we want to utilize this feature. Each string (also called an Entry) has its own key, such as 'doodles.desc'. The common practice for Lexicon keys for Extras is to prefix them with the Namespace path and a dot. This prevents collisions with other Extras.
Lexicon strings are collected in files called 'Lexicon Topics'. This means your strings can be isolated by a specific area (similar to how the core/lexicon/ directory does it), and makes it so you don't have to load all the strings for your Extra when you may only want to load a few.
If you wanted to use your Lexicons in a Snippet, you could use $modx->lexicon->load('doodles:default'). This would load the 'default' topic from the 'doodles' Namespace. For CMPs, however, this is a little different; you load it in the Controller class via the getLanguageTopics method. This method expects an array to return that will specify the Lexicon Topics to load so we can easily access them.
But we haven't actually made that Lexicon Topic file, so let's go do this now. Lexicons on the filesystem are structured thus:
{namespace_path}/lexicon/{language}/{topic}.inc.php
So we'll go ahead and create our file here: /www/doodles/core/components/doodles/lexicon/en/default.inc.php and fill it with this:
<?php
$_lang['doodle'] = 'Doodle';
$_lang['doodles'] = 'Doodles';
$_lang['doodles.desc'] = 'Manage your doodles here.';
$_lang['doodles.description'] = 'Description';
$_lang['doodles.doodle_err_ae'] = 'A doodle with that name already exists.';
$_lang['doodles.doodle_err_nf'] = 'Doodle not found.';
$_lang['doodles.doodle_err_ns'] = 'Doodle not specified.';
$_lang['doodles.doodle_err_ns_name'] = 'Please specify a name for the doodle.';
$_lang['doodles.doodle_err_remove'] = 'An error occurred while trying to remove the doodle.';
$_lang['doodles.doodle_err_save'] = 'An error occurred while trying to save the doodle.';
$_lang['doodles.doodle_create'] = 'Create New Doodle';
$_lang['doodles.doodle_remove'] = 'Remove Doodle';
$_lang['doodles.doodle_remove_confirm'] = 'Are you sure you want to remove this doodle?';
$_lang['doodles.doodle_update'] = 'Update Doodle';
$_lang['doodles.downloads'] = 'Downloads';
$_lang['doodles.location'] = 'Location';
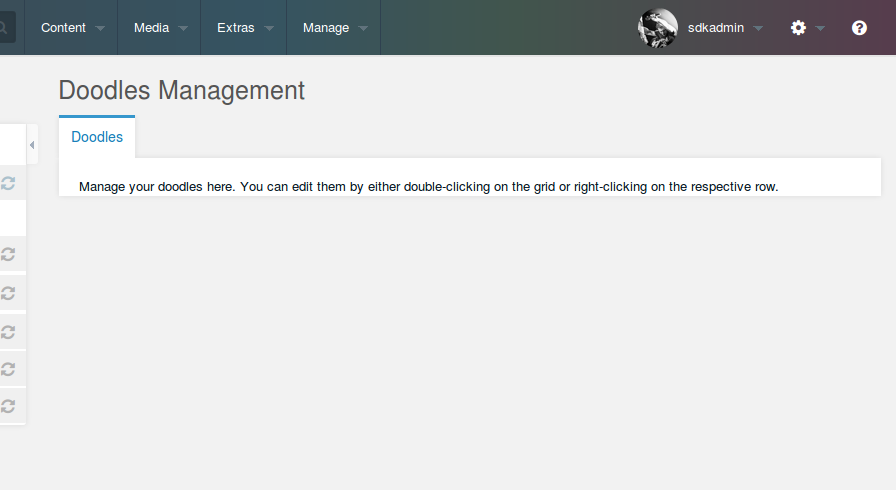
$_lang['doodles.management'] = 'Doodles Management';
$_lang['doodles.management_desc'] = 'Manage your doodles here. You can edit them by either double-clicking on the grid or right-clicking on the respective row.';
$_lang['doodles.name'] = 'Name';
$_lang['doodles.search...'] = 'Search...';
$_lang['doodles.top_downloaded'] = 'Top Downloaded Doodles';
There's quite a few strings in there! We'll use them, don't worry. Note that all we're doing is filling a PHP array called $_lang. That's it; MODX will do the rest.
You can also see our 'doodles' and 'doodles.desc' strings we referenced earlier in here.
Great! We're all setup to start developing our CMP.
Setting up the Controller with MODExt
CMPs in MODX are generated with ExtJS, a JavaScript framework by Sencha that allows for rapid and powerful UI development. MODX adds functionality to a few of the ExtJS tools (and calls them MODExt). We're going to use those tools in our CMP. This tutorial is not meant to teach you ExtJS, as there are plenty of tutorials on that on the web, and on the Sencha main site. But we will go over how to use them to create a neat grid that can do CRUD actions.
We're going to need to setup a basic controller first before we can proceed with development.
The Base Controller
Let's create our controller at: /www/doodles/core/components/doodles/controllers/index.class.php. And put this in it:
<?php
require_once dirname(dirname(__FILE__)) . '/model/doodles/doodles.class.php';
class DoodlesIndexManagerController extends modExtraManagerController {
    /** @var Doodles $doodles */
    public $doodles;
    public function initialize() {
        $this->doodles = new Doodles($this->modx);
        $this->addCss($this->doodles->config['cssUrl'].'mgr.css');
            $this->addJavascript($this->doodles->config['jsUrl'].'mgr/doodles.js');
            $this->addHtml('<script type="text/javascript">
            Ext.onReady(function() {
                Doodles.config = '.$this->modx->toJSON($this->doodles->config).';
            });
            </script>');
            return parent::initialize();
    }
    public function getLanguageTopics() {
            return array('doodles:default');
    }
    public function checkPermissions() { return true;}
    public function process(array $scriptProperties = array()) {}
    public function getPageTitle() { return $this->modx->lexicon('doodles'); }
    public function loadCustomCssJs() {
        //$this->addJavascript($this->doodles->config['jsUrl'].'mgr/widgets/doodles.grid.js');
        $this->addJavascript($this->doodles->config['jsUrl'].'mgr/widgets/home.panel.js');
        $this->addLastJavascript($this->doodles->config['jsUrl'].'mgr/sections/index.js');
    }
    public function getTemplateFile() {
        return $this->doodles->config['templatesPath'].'home.tpl';
    }
}
A bit of explanation here. What we're doing is creating a Controller Class (DoodlesIndexManagerController) for our Extra that extends modExtraManagerController, a special class for developing Extras. MODX 2.3 does request routing via Controller classes, which are all sorts of powerful. But in our Controller for our Extra, we want to make sure to always append some CSS/JS (similar to MODX 2.1 and earlier's header.php file), and also give our Controller access to the Doodles class object.
So, we do that in the initialize() method, which is called when a controller is loaded. Secondly, we define the getLanguageTopics() method to tell MODX to load our lexicon file for the manager. We then define checkPermissions(), which basically says if it doesn't return true, deny access to this controller page.
We define the process() method, which is necessary to be defined for each manager controller. We're not using it for anything, so we're going to leave it empty. Next we tell MODX what we want the page title to be via the getPageTitle() method. We'll set it to our translated version of "Doodles".
We then define the loadCustomCssJs() method, which allows us to register whatever specific CSS/JS for this specific page we want. We're loading a few 'widgets', and then loading a 'section'. These terms are arbitrary, but we're using them here in the same way MODX uses them in MODExt to render the manager interface. Basically, a "widget" is something like a grid of objects (such as Doodles), or a tree, or a specialized panel. Putting them in separate files allows you to use them in different pages without having to duplicate code. A "section" is a piece of JS that actually loads the widgets onto a page. Including a widget won't load and render it - a section will render it.
We're going to load first the doodles.grid.js, which is a widget that displays a grid of Doodles. Secondly, we load the 'home' panel, which is our home page's main panel, that the grid will reside in. And finally, we load the 'index' section, which renders the UI.
We're going to leave the grid commented out for now, but we'll come back to it. Promise.
At the bottom, we tell MODX where to find the Template file for this Controller. This is a Smarty template that MODX will use when rendering the controller.
Create your template file at /www/doodles/core/components/doodles/templates/home.tpl and fill it with this:
<div id="doodles-panel-home-div"></div>
Note that in the initialize() function of our controller, we're also loading a common JS file, mgr/doodles.js, in our JS directory. Then it runs a JS method when ExtJS has loaded that loads the config vars for our $doodles->config in the 'Doodles.config' JS object (which we'll use for paths and such). In our doodles.js file (which is found at /www/doodles/assets/components/doodles/js/mgr/doodles.js), we have this:
var Doodles = function (config) {
    config = config || {};
    Doodles.superclass.constructor.call(this, config);
};
Ext.extend(Doodles, Ext.Component, {
    page: {},
    window: {},
    grid: {},
    tree: {},
    panel: {},
    combo: {},
    config: {},
});
Ext.reg("doodles", Doodles);
Doodles = new Doodles();
So, basically, we're loading a Doodles object which extends the Ext.Component class. This also gives us a nice JavaScript namespace of 'Doodles'.
Our Doodles CMP Page
The Section JS File
Let's first create the index.js file, at /www/doodles/assets/components/doodles/js/mgr/sections/index.js:
Ext.onReady(function () {
    MODx.load({ xtype: "doodles-page-home" });
});
Doodles.page.Home = function (config) {
    config = config || {};
    Ext.applyIf(config, {
        components: [
            {
                xtype: "doodles-panel-home",
                renderTo: "doodles-panel-home-div",
            },
        ],
    });
    Doodles.page.Home.superclass.constructor.call(this, config);
};
Ext.extend(Doodles.page.Home, MODx.Component);
Ext.reg("doodles-page-home", Doodles.page.Home);
Okay, let's explain. The first thing that happens is that we tell ExtJS, when the page is nice and loaded, "load" the component (or widget/object/panel) with 'xtype' doodles-page-home. How ExtJS works is that it allows you to define components with an 'xtype', which is kind of like a unique identifier for a panel, tree, etc. Think of it like an ID for a class. MODx.load simply instantiates that object.
Below that, we actually define the 'doodles-page-home' object, and make it extend MODx.Component. MODx.Component is basically an abstracted JS class that renders a page in the MODX manager interface. It provides a few helper methods that make quick generation of MODX pages smoother. All we have to pass into it is the components we want to load; currently, in this case, the 'doodles-panel-home' component (which we haven't defined yet; it'll be in the home.panel.js file mentioned earlier). We also want it to render to the DOM ID of 'doodles-panel-home-div', which, as you might remember, was the "div" we returned earlier in our controllers/index.class.php controller.
Finally, we register this page to the 'doodles-page-home' xtype, which we are referencing in the MODx.load call earlier.
Great! On to the panel.
The Panel JS File
We've got our page, but now we want to load a panel in it. Let's create a file at www/doodles/assets/components/doodles/js/mgr/widgets/home.panel.js and put this in it:
Doodles.panel.Home = function (config) {
    config = config || {};
    Ext.apply(config, {
        border: false,
        baseCls: "modx-formpanel",
        cls: "container",
        items: [
            {
                html: "<h2>" + _("doodles.management") + "</h2>",
                border: false,
                cls: "modx-page-header",
            },
            {
                xtype: "modx-tabs",
                defaults: { border: false, autoHeight: true },
                border: true,
                items: [
                    {
                        title: _("doodles"),
                        defaults: { autoHeight: true },
                        items: [
                            {
                                html:
                                    "<p>" +
                                    _("doodles.management_desc") +
                                    "</p>",
                                border: false,
                                bodyCssClass: "panel-desc",
                            } /*,{
                    xtype: 'doodles-grid-doodles'
                    ,cls: 'main-wrapper'
                    ,preventRender: true
                }*/,
                        ],
                    },
                ],
                // only to redo the grid layout after the content is rendered
                // to fix overflow components' panels, especially when scroll bar is shown up
                listeners: {
                    afterrender: function (tabPanel) {
                        tabPanel.doLayout();
                    },
                },
            },
        ],
    });
    Doodles.panel.Home.superclass.constructor.call(this, config);
};
Ext.extend(Doodles.panel.Home, MODx.Panel);
Ext.reg("doodles-panel-home", Doodles.panel.Home);
So, first, at the bottom, note how we're registering this panel to 'doodles-panel-home', which we referenced in our section. Also note that this panel extends MODx.Panel, which in turn extends Ext.Panel. Why not just extend Ext.Panel? Well, extending MODx.Panel does the same, and adds a CSS class to the panel to give it the nice manager MODX styling.
We're going to give this panel a baseCls of 'modx-formpanel', which lets our top part have a transparent background. And we want a class of 'container', which handles spacing. Then, we'll make sure it doesn't have a border.
Next, we'll define the 'items' in the panel. First, we add a header:
{
    html: '<h2>'+_('doodles.management')+'</h2>'
    ,border: false
    ,cls: 'modx-page-header'
}
Basically this just inserts some HTML into the top of the panel with a class of 'modx-page-header', and puts a nice h2 tag up there. Note the _() method. This is MODX's way of doing i18n (Lexicons) in the manager JS. This tells MODX to translate this key. If you remember, we defined the 'doodles.management' string earlier with: "Doodles Management". So this will render the translation of this key in the h2 tag.
Next, we'll add a TabPanel. We could just load the panel straight without tabs, but what if down the line we wanted to add another tab? Let's define it:
,{
   xtype: 'modx-tabs'
   ,defaults: { border: false ,autoHeight: true }
   ,border: true
   ,items: /* ... */
}
Note we load our tabpanel with the xtype 'modx-tabs'. This loads a MODX-specific tabpanel, which has some MODX-specific configuration options. Then we give it some padding, a border, and make sure the defaults for its tabs have no border and an automatic height. Then, we add the tab itself:
{
   title: _('doodles')
   ,defaults: { autoHeight: true }
   ,items: [{
      html: '<p>'+_('doodles.management_desc')+'</p>'
      ,border: false
      ,bodyCssClass: 'panel-desc'
   }]
}
Okay, this is going to load our first tab with a tab title translated to 'Doodles'. Then, we'll put some stuff in the tab (which is an Ext.Panel, by the way). We'll first put a nice little description with our "doodles.management_desc" lexicon string.
Let's load the page and take a look now. You may need to refresh the Manager page to get the Doodles component loaded into the Components menu.
Cool! We've got a MODX-styled panel going. Unfortunately, it's pretty useless. We need to add a grid to manage our Doodles. Let's go ahead and do that now.
The Doodles Grid
First off, go ahead and uncomment this line in your index.class.php controller:
$this->addJavascript($doodles->config['jsUrl'].'mgr/widgets/doodles.grid.js');
This tells MODX to load the grid widget file, which we'll now create at /www/doodles/assets/components/doodles/js/mgr/widgets/doodles.grid.js:
Doodles.grid.Doodles = function (config) {
    config = config || {};
    Ext.applyIf(config, {
        id: "doodles-grid-doodles",
        url: Doodles.config.connectorUrl,
        baseParams: { action: "mgr/doodle/getList" },
        fields: ["id", "name", "description", "menu"],
        paging: true,
        remoteSort: true,
        anchor: "97%",
        autoExpandColumn: "name",
        columns: [
            {
                header: _("id"),
                dataIndex: "id",
                sortable: true,
                width: 60,
            },
            {
                header: _("doodles.name"),
                dataIndex: "name",
                sortable: true,
                width: 100,
                editor: { xtype: "textfield" },
            },
            {
                header: _("doodles.description"),
                dataIndex: "description",
                sortable: false,
                width: 350,
                editor: { xtype: "textfield" },
            },
        ],
    });
    Doodles.grid.Doodles.superclass.constructor.call(this, config);
};
Ext.extend(Doodles.grid.Doodles, MODx.grid.Grid);
Ext.reg("doodles-grid-doodles", Doodles.grid.Doodles);
Whew, a lot in there! Let's start off with the configuration parameters we're setting.
- id: We give this panel an ID of 'doodles-grid-doodles'.
- url: We point it to the connector file at Doodles.config.connectorUrl (we'll get to connectors here in a second).
- baseParams: We setup it's base parameters to send when getting records for the grid via REQUEST with a key of 'action' and a value of 'mgr/doodle/getList'. More on this in a second.
- fields: We setup the fields we'll get from the AJAX request to populate the grid. Basically, these are the fields of our Doodle.
- paging: We want pagination for our grid, so MODExt handles all of this just by setting 'paging: true' here.
- remoteSort: We set this to true, and Ext will allow our grid columns to be sortable.
- anchor: We want this grid to stretch the panel width, so we set it to 97% (3% less to account for padding).
- autoExpandColumn: We want to stretch the 'name' column to dynamically be the biggest column on the grid.
Then, we define some columns for our grid. We also allow 'name' and 'description' to be editable by attaching an editor to each column. More on this later. Note how the 'dataIndex' parameter matches the name of the Doodles field we want to display.
Finally, let's add the grid to our panel. Remove the comment tags in the home.panel.js file at lines 22 and 26 :
[
    {
        html: "<p>" + _("doodles.management_desc") + "</p>",
        border: false,
    },
    {
        xtype: "doodles-grid-doodles",
        cls: "main-wrapper",
        preventRender: true,
    },
];
That loads our grid right below the message we posted earlier in our panel, with some nice spacing via the class. The preventRender attribute tells Ext not to render the grid until the rest of the panel loads.
If you tried to load the page now, the grid would show, but not load any data - we haven't made our Connector yet, and so the grid doesn't have anywhere to fetch its data. Let's do that.
Hooking Up via Connectors
What is a Connector in MODX? A Connector is, technically, a file that 'connects' to the model layer of MODX, or the Processors. Processors are form-layer files that run DB queries and other things that modify the model and/or database.
In laymen's terms, Processors are where you will do all your database modifying. Connectors are a 'gateway' to these processors. They restrict access, check access permissions, and 'route' requests to the appropriate processor. They also limit the access points to your model, further securing your app. Think of your model as a fortress, your DB as the palace in the center, the processors the roads in that fortress, and connectors as the gates in the walls around your fortress. You want those gates to be secure, and limited in number.
Back to our Extra. Our ExtJS grid needs to load its data for its rows via AJAX by our connector. But we need to create our connector first. Let's make it at /www/doodles/assets/components/doodles/connector.php:
<?php
require_once dirname(dirname(dirname(dirname(__FILE__)))).'/config.core.php';
require_once MODX_CORE_PATH.'config/'.MODX_CONFIG_KEY.'.inc.php';
require_once MODX_CONNECTORS_PATH.'index.php';
$corePath = $modx->getOption('doodles.core_path',null,$modx->getOption('core_path').'components/doodles/');
require_once $corePath.'model/doodles/doodles.class.php';
$modx->doodles = new Doodles($modx);
$modx->lexicon->load('doodles:default');
/* handle request */
$path = $modx->getOption('processorsPath',$modx->doodles->config,$corePath.'processors/');
$modx->request->handleRequest(array(
    'processors_path' => $path,
    'location' => '',
));
That's it. We first load the config.core.php file. We'll go ahead and add it here in our development environment; in standard MODX installs, this will already exist.
On different circumstances, you can create a file at your different folder, eg: /www/doodles/config.core.php and put this in it:
<?php
define('MODX_CORE_PATH', '/www/modx/core/');
define('MODX_CONFIG_KEY', 'config');
Obviously, you'll need to change those values to your MODx installation paths. And if you're using SVN or Git for your Extra, you'll want to add those to your ignore file (ie, .gitignore), since you don't want those in your source repository.
Next in our connector, we load the config file, and the MODX connectors/index.php file.
Then, we load our Doodles class (with our magic system settings!), which will add our xPDO custom Doodles model into MODX, and then load our default doodles Lexicon Topic. Finally, we 'handle' the request using our custom Processors path we defined in our Doodles class, and tell MODX to load the processors.
This file will do nothing on its own when access. Loading it directly will give you this:
{
    "success": false,
    "message": "Access denied.",
    "total": 0,
    "data": [],
    "object": []
}
There's a few reasons for this. One is that the connectors are locked down and don't allow anyone without a MODX manager session to access them. Secondly, all requests to connectors must pass a unique-to-your-site authorization key that prevents CRSF attacks. It can either be passed in the HTTP headers as 'modAuth', or in a REQUEST var as HTTP_MODAUTH. The value will be $modx->siteId, which is set on a new install, and loaded when MODX is loaded.
Don't ever paste or share with anyone your $modx->siteId or HTTP_MODAUTH key. It keeps your site secure.
The great thing, though, is you won't have to worry about this. MODX already handles this in MODExt - all HTTP requests made by ExtJS in MODX pass this variable in via their HTTP headers.
The second reason loading the connector file directly won't work is that we didn't specify a routing path - remember baseParams in the grid? Remember how we set the 'action' param in it to 'mgr/doodle/getList'? That's our routing path. That tells the connector to load the file at:
/www/doodles/core/components/doodles/processors/mgr/doodle/getlist.class.php
So let's go ahead and make that file to give our grid some data:
<?php
class DoodleGetListProcessor extends modObjectGetListProcessor {
    public $classKey = 'Doodle';
    public $languageTopics = array('doodles:default');
    public $defaultSortField = 'name';
    public $defaultSortDirection = 'ASC';
    public $objectType = 'doodles.doodle';
}
return 'DoodleGetListProcessor';
Great. So a few things. You'll note that we're in a class again - MODX 2.2 has new shiny Processor classes, including an assistance class named modObjectGetListProcessor that we're extending here. This class automatically does all the basic logic for handling normal CRUD processor actions, such as this one. All we have to do is specify some class variables on the class - such as $classKey, $objectType, and more. Let's dig into those:
-
$classKey- This tells the Processor what MODX Class to grab. We want to grab our Doodle objects. -
$languageTopics- An array of language topics to load for this processor. -
$defaultSortField- The default sort field to use when grabbing the data. -
$defaultSortDirection- The default sort direction to do when grabbing the data. -
$objectType- This is often used to determine what error lexicon strings to load when grabbing data. Since in our lexicon file we have all the strings as$_lang['doodles.doodle_blahblah']and such, we'll specify the prefix here of "doodles.doodle". MODX then will prefix standard error messages with that prefix.
The assistance class handles the rest, so we don't have to worry about it! All we have to do is "return" the name of the Processor class so MODX knows where to find it.
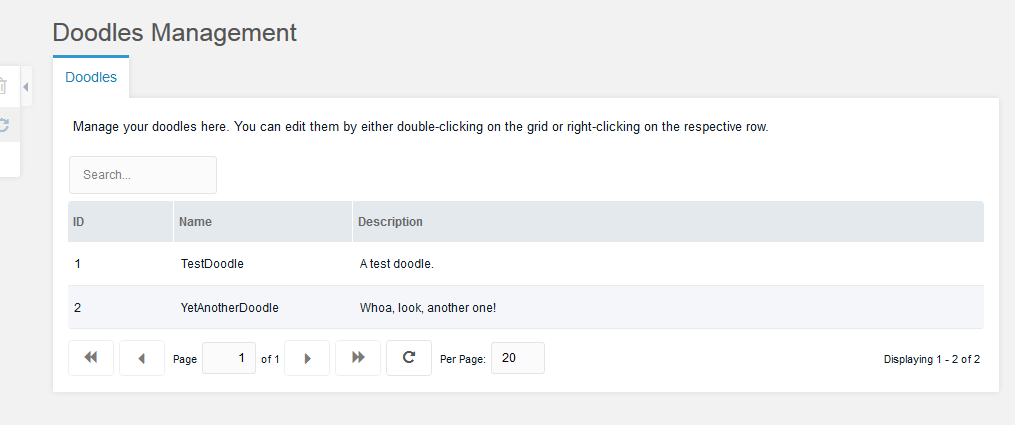
That's it. Now let's load up our grid:
Great! We've got a working grid. Now, let's add some functionality to it, since right now all it does is list Doodles.
Adding Search
Add this bit of code to your grid panel in widgets/doodles.grid.js, right after the columns: definition at line 29:
,tbar:[{
    xtype: 'textfield'
    ,id: 'doodles-search-filter'
    ,emptyText: _('doodles.search...')
    ,listeners: {
        'change': {fn:this.search,scope:this}
        ,'render': {fn: function(cmp) {
            new Ext.KeyMap(cmp.getEl(), {
                key: Ext.EventObject.ENTER
                ,fn: function() {
                    this.fireEvent('change',this);
                    this.blur();
                    return true;
                }
                ,scope: cmp
            });
        },scope:this}
    }
}]
We just added a textfield to the top bar of our grid, and we gave it some 'emptyText', meaning that when empty, display this text. Also, we gave it a DOM ID of 'doodles-search-filter', and told it to run the 'this.search' method when it changes. Also, the code in the 'render' listener means to fire the change event when someone hits ENTER on their keyboard when editing it.
So let's define the 'this.search' method - since our Panel is OOP, this means that this.search can be defined in our grid object. To do that, find this code, now at line 52:
Ext.extend(Doodles.grid.Doodles, MODx.grid.Grid);
And replace it with this:
Ext.extend(Doodles.grid.Doodles, MODx.grid.Grid, {
    search: function (tf, nv, ov) {
        var s = this.getStore();
        s.baseParams.query = tf.getValue();
        this.getBottomToolbar().changePage(1);
        this.refresh();
    },
});
What we're telling it to do here is to extend the MODx.grid.Grid class, and then add another method called 'search'. In that method, we're getting the grid's "Store", which is where the data for the grid is stored and what determines where the data comes from. Then, we are adding a 'query' parameter to our baseParams (remember that earlier?), changing the current page of the grid back to 1, and refreshing it.
This will pass a 'query' REQUEST parameter to our getList Processor in the getlist.class.php file. Since we're not doing anything to handle that yet, let's go open it up. Add this method to the class after line 7:
    public function prepareQueryBeforeCount(xPDOQuery $c) {
        $query = $this->getProperty('query');
        if (!empty($query)) {
            $c->where(array(
                'name:LIKE' => '%'.$query.'%',
                'OR:description:LIKE' => '%'.$query.'%',
            ));
        }
        return $c;
    }
The modObjectGetListProcessor assistance class lets us extend the prepareQueryBeforeCount() method to modify the xPDOQuery object before it's passed to the getCount() method. All we have to do is return our modified query object. We're going to extend it here to add searchability to our grid via the "query" parameter. Note we can get whatever that parameter is via the neat ->getProperty() method.
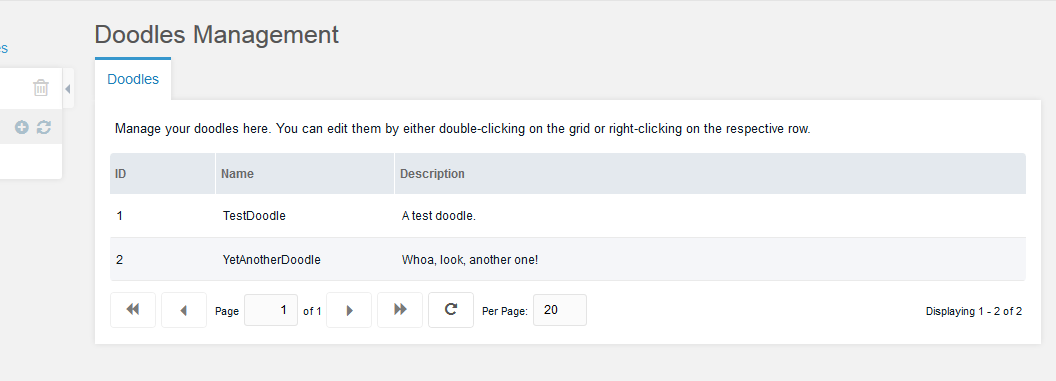
Now load your grid, and you'll get:
And there's our searchable grid. Now let's work on updating records.
Adding an Update Window
First off, MODX grids usually have context menus when you click them. Ours doesn't, and that's because we haven't defined it yet. Let's go ahead and define it. Add a 'getMenu' method to your Doodles.grid.Grid definition, right below your search: method we just added, line 48:
,getMenu: function() {
    return [{
        text: _('doodles.doodle_update')
        ,handler: this.updateDoodle
    },'-',{
        text: _('doodles.doodle_remove')
        ,handler: this.removeDoodle
    }];
}
MODX looks for a getMenu method on grids that extend it, and if it finds it, it runs it. It adds then any menu items you return. Here we've added 2 menu items for our context menu, one that runs a this.updateDoodle method, and the other that runs a this.removeDoodle method. We'll get to the removeDoodle method here in a bit. For now, let's add another JS method below the getMenu call, line 58, and call it updateDoodle:
,updateDoodle: function(btn,e) {
    e.preventDefault();
    if (!this.updateDoodleWindow) {
        this.updateDoodleWindow = MODx.load({
            xtype: 'doodles-window-doodle-update'
            ,record: this.menu.record
            ,listeners: {
                'success': {fn:this.refresh,scope:this}
            }
        });
    }
    this.updateDoodleWindow.setValues(this.menu.record);
    this.updateDoodleWindow.show(e.target);
}
A few things. What this little bit of code does is checks for a class variable named 'updateDoodleWindow'. If it doesn't find it, it creates it. This prevents us from having to have ExtJS create a new window every time (it's faster and better to prevent DOM ID conflicts). Also, it passes in a few values:
- xtype - This is obviously our unique xtype for the window, which is 'doodles-window-doodle-update'. We'll get to that soon.
- record - MODx.Window objects will automatically fill their fields with whatever is passed into the 'record' configuration param. Also, MODx.grid.Grid objects always have the current row values stored in the 'this.menu.record' object. So we'll just pass that right in to our Window.
- listeners - These execute on different events in the window. For now, we just want to refresh the grid (via the 'this.refresh' method for the MODx.grid.Grid) whenever the window succeeds; meaning whenever the window's form successfully submits and returns a 'success' response.
After we create the window, we'll run the show() method on it to show it. The 'e.target' just tells it to animate the opening from wherever the mouse was. If we already had a window object, before that we call setValues on it, which sets the values of the Window's form to the passed in value (similar to the record: param). This allows us to re-use windows.
Now let's actually define the window with this code at the end of the file:
Doodles.window.UpdateDoodle = function (config) {
    config = config || {};
    Ext.applyIf(config, {
        title: _("doodles.doodle_update"),
        url: Doodles.config.connectorUrl,
        baseParams: {
            action: "mgr/doodle/update",
        },
        fields: [
            {
                xtype: "hidden",
                name: "id",
            },
            {
                xtype: "textfield",
                fieldLabel: _("doodles.name"),
                name: "name",
                anchor: "100%",
            },
            {
                xtype: "textarea",
                fieldLabel: _("doodles.description"),
                name: "description",
                anchor: "100%",
            },
        ],
    });
    Doodles.window.UpdateDoodle.superclass.constructor.call(this, config);
};
Ext.extend(Doodles.window.UpdateDoodle, MODx.Window);
Ext.reg("doodles-window-doodle-update", Doodles.window.UpdateDoodle);
Similar to what you've seen in the grids, except this time we have 'fields' as the fields for the Window's form. We've provided some fields to edit - and remember, since this is an "Update" form, we need to provide the ID of the Doodle, passed in as a hidden field.
MODx.Window wraps Ext.Window, but provides a form inside that will automatically try and connect to the url: param with the baseParams: parameters, as well as the fields' values. It also automatically provides OK/Cancel buttons. Right-click on a record in the grid, and your window should look like this now:
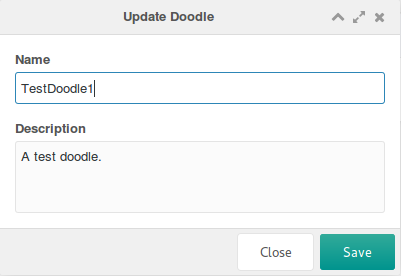
Excellent! We've got a nice little update window. Now as you probably noticed in our baseParams, we're looking now for the 'mgr/doodle/update' processor. So let's create a file at: /www/doodles/core/components/doodles/processors/mgr/doodle/update.class.php:
<?php
class DoodleUpdateProcessor extends modObjectUpdateProcessor {
    public $classKey = 'Doodle';
    public $languageTopics = array('doodles:default');
    public $objectType = 'doodles.doodle';
}
return 'DoodleUpdateProcessor';
Again, we're going to create our Processor class by extending an assistance Processor class that MODX provides. This one automatically does all the dirty work for saving an object. All we have to do is specify the classKey and a few other parameters. It handles all the saving and the response automatically. Now we have a working Update form!
Adding a Remove Context Menu Option
Let's finish off the remove part of our UI. We've already got the context menu showing up, so we just need to add the JS method and the processor. After our updateDoodle method in our JS grid, add this at line 70:
,removeDoodle: function() {
    MODx.msg.confirm({
        title: _('doodles.doodle_remove')
        ,text: _('doodles.doodle_remove_confirm')
        ,url: this.config.url
        ,params: {
            action: 'mgr/doodle/remove'
            ,id: this.menu.record.id
        }
        ,listeners: {
            'success': {fn:this.refresh,scope:this}
        }
    });
}
MODx.msg.confirm pops up a confirmation dialog, and if confirmed, runs a processor via a connector. Let's take a look at each parameter:
- title - This is the title of the confirmation dialog.
- text - The text of the dialog. Here it basically asks if we really want to remove a Doodle.
- url - The URL to the connector.
- params - Any REQUEST parameters to send to the processor. We're going to send the processor path, and the ID of the Doodle to remove.
- listeners - Similar to our update form's listeners, whenever this succeeds, refresh the grid.
Now let's create our remove processor at /www/doodles/core/components/doodles/processors/mgr/doodle/remove.class.php:
<?php
class DoodleRemoveProcessor extends modObjectRemoveProcessor {
    public $classKey = 'Doodle';
    public $languageTopics = array('doodles:default');
    public $objectType = 'doodles.doodle';
}
return 'DoodleRemoveProcessor';
Pretty similar to the update processor, except this time, we extend modObjectRemoveProcessor, which handles deleting the Doodle from the database. That's it! We can now remove Doodles.
Creating the Create Form
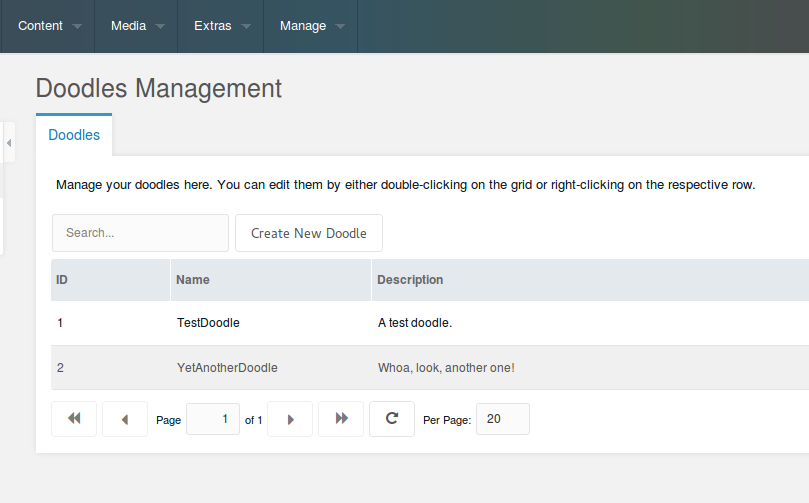
So we've got R, U and D of our CRUD interface. What about C? Let's work on a create form. Let's add a button to the top toolbar of the grid to load the create window. Add this to the tbar: property on the grid config in doodles.grid.js, right after our search textfield at line 48. Be careful to insert it between the closing curly bracket of the search textfield and the closing square bracket of the tbar:
,{
   text: _('doodles.doodle_create')
   ,handler: { xtype: 'doodles-window-doodle-create' ,blankValues: true }
}
MODExt allows you to pass JSON objects into the handler: method on toolbars. What this does is loads the Window with the xtype 'doodles-window-doodle-create', makes sure its values are blanked on load, and runs this.success on a successful window form submit (basically shortcuts the stuff we've been doing). That's what we want, so let's now define the window at the end of our file:
Doodles.window.CreateDoodle = function (config) {
    config = config || {};
    Ext.applyIf(config, {
        title: _("doodles.doodle_create"),
        url: Doodles.config.connectorUrl,
        baseParams: {
            action: "mgr/doodle/create",
        },
        fields: [
            {
                xtype: "textfield",
                fieldLabel: _("doodles.name"),
                name: "name",
                anchor: "100%",
            },
            {
                xtype: "textarea",
                fieldLabel: _("doodles.description"),
                name: "description",
                anchor: "100%",
            },
        ],
    });
    Doodles.window.CreateDoodle.superclass.constructor.call(this, config);
};
Ext.extend(Doodles.window.CreateDoodle, MODx.Window);
Ext.reg("doodles-window-doodle-create", Doodles.window.CreateDoodle);
This is very similar to our Update window, except this one doesn't have an ID field, and passes 'create' as the processor. So, on to the processor at: /www/doodles/core/components/doodles/processors/mgr/doodle/create.class.php:
<?php
class DoodleCreateProcessor extends modObjectCreateProcessor {
    public $classKey = 'Doodle';
    public $languageTopics = array('doodles:default');
    public $objectType = 'doodles.doodle';
    public function beforeSave() {
        $name = $this->getProperty('name');
        if (empty($name)) {
            $this->addFieldError('name',$this->modx->lexicon('doodles.doodle_err_ns_name'));
        } else if ($this->doesAlreadyExist(array('name' => $name))) {
            $this->addFieldError('name',$this->modx->lexicon('doodles.doodle_err_ae'));
        }
        return parent::beforeSave();
    }
}
return 'DoodleCreateProcessor';
Similar to the update and remove methods, again, except we aren't grabbing the object, but rather creating it. We're extending the modObjectCreateProcessor assistance class now.
Also, we have a bit of form validation beforehand - we're going to make sure the name isn't blank, and if it is, return a custom error message on that specific field. If it's not blank, then we'll make sure there's no other Doodles with that name. Note we extended the beforeSave() method to do this, and then return the parent class's running of that same method. Then, inside of it, we do two things:
- Check to see if the name is empty and if so, add a field-specific error to the "name" field saying so
- Otherwise, see if a Doodle already exists (using the helper doesAlreadyExist method, which takes in a criteria array to search for), and if so, return a field-specific error to the "name" field saying so
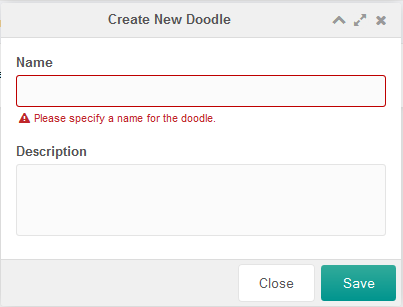
Pretty neat, huh? Field-specific validation, built right in. And we've got a working create form!
Adding Inline-Editing
MODExt also has automatic inline editing built right into its grids. Simply add this to your Doodles.grid.Grid config object, right below the 'autoExpandColumn' property:
,save_action: 'mgr/doodle/updateFromGrid'
,autosave: true
That tells the grid to turn on inline editing and saving; and also to send any saves to the processor at mgr/doodle/updateFromGrid. So let's create it, at: /www/doodles/core/components/doodles/processors/mgr/doodle/updatefromgrid.class.php:
require_once (dirname(__FILE__).'/update.class.php');
class DoodleUpdateFromGridProcessor extends DoodleUpdateProcessor {
    public function initialize() {
        $data = $this->getProperty('data');
        if (empty($data)) return $this->modx->lexicon('invalid_data');
        $data = $this->modx->fromJSON($data);
        if (empty($data)) return $this->modx->lexicon('invalid_data');
        $this->setProperties($data);
        $this->unsetProperty('data');
        return parent::initialize();
    }
}
return 'DoodleUpdateFromGridProcessor';
Note how we're just extending our Update processor class (after including it), and in the initialize() method, parsing our "data" property from JSON (which our grid sends with the updated record) and setting that as the properties for the Processor. Then the Update processor handles the rest. Simple, eh?
Summary
We've got ourselves a nice CRUD user interface now, with creating, updating, removing, searching, pagination, and sorting. And all pretty easily, too.
Next, in Part III, we'll explore creating a Transport Package for our Doodles Extra so that we can distribute it on modxcms.com and via Revolution's Package Management system.
This tutorial is part of a Series:
- Part I: Getting Started and Creating the Doodles Snippet
- Part II: Creating our Custom Manager Page
- Part III: Packaging Our Extra
The $objectType shown in all processors is not necessary to set.
I have made a couple of custom components and I have setupped a "afterSaveEvent" and "afterRemoveEvent" etc. But then there isn't a name like "object" passed to your plugin (containing your object). The name passed is based on the $objectType value. So when you have Doodles.. you will get a "doodles.doodle" passed into your plugin. With 10 components, 10 different types, this is very un-wanted.
So I have figured out that this $objectType is not required to let the processors work properly. When you leave that, MODX falls back on "object" so you will have $scriptProperties['object'] in your plugin, instead of many different type names.
Note
Saves about 30 bytes disk space per processor :-)
Support the team building MODX with a monthly donation.
The budget raised through OpenCollective is transparent, including payouts, and any contributor can apply to be paid for their work on MODX.
Backers
Budget
$248 per month—let's make that $500!
Learn more