Moving Your Site


Last updated May 23rd, 2021 | Page history | Improve this page | Report an issue
Support the team building MODX with a monthly donation.
The budget raised through OpenCollective is transparent, including payouts, and any contributor can apply to be paid for their work on MODX.
Backers


Budget
$248 per month—let's make that $500!
Learn moreMODX Revolution is a database-driven web application, so moving it to a new server involves the typical porting over of both the database and all the site's files. In Revolution, it's more or less the same process, but there are couple extra tidbits to watch out for due to Revolution's thorough caching mechanisms and how certain server-specific data is stored in its database.
Following is the official documentation of how to move your site to a new location. Normally, the move is to a new server, but the steps here also apply if you move your site to a new folder on your current web server.
Tip It's not required, but it's a very good idea to turn off Friendly URLs (FURLS) in the Manager, if you have them on, and rename .htaccess to ht.access on your site before performing any of the steps below. Do the reverse as your last step after everything is working at the new location (rename ht.access to .htaccess and turn on FURLS). It takes a big potential source of confusion out of the picture during the transition.
Log into the Manager: Clear your Cache and Sessions
Before doing anything else, it would be wise to empty all of the cached content.
- Log into the [Manager]((getting-started/glossary), then:
Manage-->Clear Cache - Clear your Sessions:
Manage-->Logout All Users
The first benefit of this is a smaller download / upload file.
The safest and surest method to clear the cache is to clear it manually. Do this by deleting all the contents contained within the core/cache folder. This process is typically fastest when performed in the server's file manager / via SSH, as opposed to FTP.
Packaging up your Files
Any time you pack up a site and move, it's best to package the files into "boxes" – when you move out of your apartment, you put everything into boxes; the same concept is true with files: package them. If you simply drag and drop files from one server to another using a GUI interface, chances are good that the GUI will omit hidden files such as the vital .htaccess file. Besides, transferring hundreds of files via FTP can take a long time because each file must often undergo some sort of authentication; in other words copying over a hundred 1 megabyte files takes a lot longer than copying over a single 100 megabyte file.
On a UNIX style system, you can create a compressed file using the tar command:
tar -czf /path/to/backups/modx_revo_site.tar.gz /path/to/modx_doc_root/
Forget me Not A good mnemonic for the "-czf" option is Create Zip File.
Once you arrive on the other end, it's good to put the zipped file into its own directory before you extract it. The idea here is that if it explodes, it's easier to clean up the mess if it's contained in its own directory.
On a UNIX style system, you can unpackage a .tar.gz file using the following commands from a command line:
gunzip modx_revo_site.tar.gz
tar xvf modx_revo_site.tar
Once you've extracted the files, you can move the whole directory into the correct place. Again, be careful about moving files in bulk: you might inadvertently forget to copy those hidden files. It's better to rename or move the containing directory instead.
Change File Ownership
Sometimes the group and user ownership will change when moving from one host to another. Make sure that the files are owned and accessible to the web server. You will have to check the server configuration to ascertain the correct settings, or simply ask the host for the details. A simpler method may be to simply look at the ownership placed on the tar.gz file when it was uploaded to the server. FTP software will almost always set the proper ownership on an uploaded file.
Writable: 777 or 755?
Some of the folders may need to be writable. Depending on the security configuration of the service this may need to be 755 or 777. The tar.gz file should retain the old server permissions -- but those may not work on the new server.
Dumping your Database
Please note that MODX can run on multiple database drivers, currently MySQL and sqlsrv. The following section is MySQL specific, however you should be able to do the same with similar commands for sqlsrv.
You can dump your MySQL database using a GUI tool such as phpMyAdmin, or you can run the command-line mysqldump utility.
mysqldump -u username -p your_revo_db > /path/to/backups/my_revo_db.sql
If you use mysqldump, be sure you use a username that has SELECT and LOCK permissions on all your MODX Revolution database tables – usually it's best to simply use the same username and password that are defined in your configuration file (/core/config/config.inc.php). Remember that mysqldump will prompt you for the password after you execute this command: when you type it (or paste it), you won't see anything in the terminal window.
On the new server, you can simply use the mysql command to slurp the dump file into the new target database:
mysql -u username -p target_db < my_revo_db.sql
You can also use phpMyAdmin, but remember that web-based tools like this are subject to the same memory limits as PHP, so you're usually better off using a command-line tool if possible.
Many server control panels offer database backup and compression tools as well.
Updating your Config Files
Once you've deployed files to the new server, you need to update the main configuration file: core/config/config.inc.php. You have to update paths to 6 different resources. Open the file and update the values for the following variables doing a find and replace:
/* PATHS */
$modx_core_path= '/path/to/modx_doc_root/core/';
$modx_processors_path= '/path/to/modx_doc_root/core/model/modx/processors/';
$modx_connectors_path= '/path/to/modx_doc_root/connectors/';
$modx_manager_path= '/path/to/modx_doc_root/manager/';
$modx_base_path= '/path/to/modx_doc_root/';
$modx_assets_path= '/path/to/modx_doc_root/assets/';

/* HOST (used for command-line PHP stuff) */
$http_host='yoursite.com';
If you are also moving your site into or out of a subfolder, be sure to update the variables such as $modx_connectors_url, $modx_manager_url, and $modx_base_url. They should generally end with a slash (e.g., $modx_base_url='/' for a site not in a subfolder).
Permissions Before you can edit your config file, you may need to loosen up the permissions. After you've edited it, be sure you restore the read-only permissions on the file.
There are also 3 additional configuration files that contain two PHP constants:
define('MODX_CORE_PATH', '/path/to/modx_doc_root/core/');
define('MODX_CONFIG_KEY', 'config');
- /config.core.php
- /connectors/config.core.php
- /manager/config.core.php
Make sure you update the paths in these files as well.
*If you are working with a ~temporary folder on your server, the url for development is often preceded with a ~yoursitehome addition in the path. The configuration files noted above will include this temporary path on the development installation. Make sure to check all the above 4 files for this temporary path and change to the above settings for production root installs.
Update your Database
Don't Forget the Database MODX stores some path data in its database! When you move servers, you may have to update the workspaces table, otherwise the manager page may show a white page.
Please note that MODX can run on multiple database drivers, currently MySQL and sqlsrv. The following section is MySQL specific, however you should be able to do the same with similar commands for sqlsrv.
Sometimes developers structure their development and production servers to use the exact same path information, but often the file path information will change when we move our MODX web site to a new server.
To see the path information that is stored inside the MODX database, type the following query into phpMyAdmin, the MySQL command line, or any other application that allows you to execute queries on your database:
SELECT `path` FROM `your_revo_db`.`workspaces`;
Change "your_revo_db" to your database name, and add an appropriate prefix to the "workspaces" table if necessary, e.g. modx\_workspaces.
If the path on the new server is different than on the old server, you will need to update this record. You can edit it using a GUI editor (like SQL-Yog or phpMyAdmin), or you can execute the following command (again, you need to customize the query depending on your database, prefix, and the path to your data):
UPDATE `your_revo_db`.`workspaces` SET path='/path/to/modx_doc_root/core/' WHERE id='1';
Update .htaccess
When you change servers, you frequently wind up changing domain names. Make sure you update any references to the domain name in your .htaccess file(s).
On the New Server
Log into the manager on the new server to verify that it works. Upon entry, you may experience:
Could not find action file at: /path/to/manager/controllers/default/welcome.php
That's because the old path is still cached; MODX Revolution caches a lot of information in the database and on the file system, so once you've gotten the files and database transferred over to the new server, make sure you clear your site's cache once again, and manually refresh the manager page.
If the cache and session information was not cleared before the move you will need to do so, if you encounter errors within the manager after moving the site.
Sometimes clearing the site cache in the manager won't fix all path issues and it is nessesary to remove all folders/files inside the core/cache folder by FTP/SSH/command line or hosting panel file manager.
Re-run setup
Whenever changes are made to a MODX Revolution site in regards to installs, upgrades, or change of location it is important to re-run the domain.com/setup script. This should assist in solidifying the movement process due to the actions taken during its process.
- Make sure you are running the setup version from the same version of MODX Revolution you will be using.
- Get the transferred site functional before attempting any version upgrades.
Download Previous Versions of MODX Revolution
If MODX does not find a config.inc.php file during setup, it will not offer you the option of doing an upgrade install. Do not proceed unless you can check the "Upgrade Install" checkbox. It the config.inc.php file is there but MODX is not finding it, check the path specified in the config.core.php files described above in the Updating Your Config Files section. MODX uses that path to find the config.inc.php file.
Updating your Extras settings
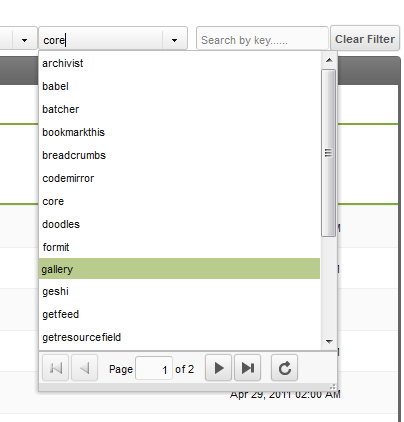
Some extras, such as Gallery, store information on where certain files can be found in their own settings. To take Gallery as the example, it stores the path to its assets, core, files and phpthumb folders on the filesystem. Depending on your setup these will change when moving and in order to keep using these addons you will need to update those paths. While every addon can decide for itself where to store paths, one of the popular locations is in the system settings.
Go to System -> System Settings in your Manager, and find the namespaces dropdown, as seen on the image to the right (click to enlarge). Open it and look for the extra of your choice, for instance Gallery. Not all extras specify system settings but most of them will show up on the list anyway. Now that you have found where these paths are stored you can update them to reflect the new location.
If you are using MODX Revolution 2.2, you may also need to check the extension_packages system setting (found under the System & Server area in the System Settings). This setting is used for custom resource classes (such as the Articles extra) and defines the path to its model - this may need to be updated after moving your site.
Troubleshooting / Errors
In progress... trying to document problems and solutions...
Setup Errors
You may encounter problems when re-running Setup on the new server. Sometimes re-running setup fails, but copying the files and database ends up with a working site. Remember: re-running setup is only necessary if you have loose-ends somewhere that broke during the transfer.
Class xPDODriver_ not found
This manifests itself as an error message like the following:
Fatal error: Class 'xPDODriver_' not found in /path/to/webroot/core/xpdo/xpdo.class.php on line 1823
This is usually a sign that your configuration file got mangled. Re-open your core/config/config.inc.php and verify that its contents are in place. A mangled config file contains placeholders instead of values.
$database_type = '{database_type}';
$database_server = '{database_server}';
$database_user = '{database_user}';
$database_password = '{database_password}';
$database_connection_charset = '{database_connection_charset}';
$dbase = '{dbase}';
$table_prefix = '{table_prefix}';
$database_dsn = '{database_dsn}';
$config_options = {config_options};
$driver_options = {driver_options};
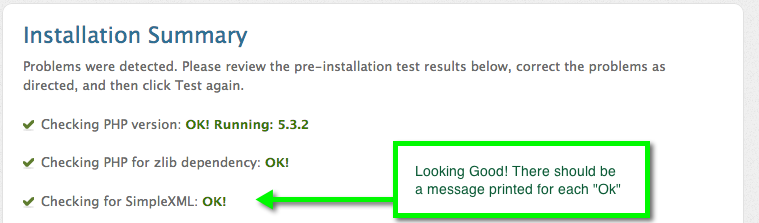
Installation Summary shows Incomplete Items
This can be a bad omen: the Installation Summary page does not describe messages. This can be a sign that permissions are not correct somewhere.
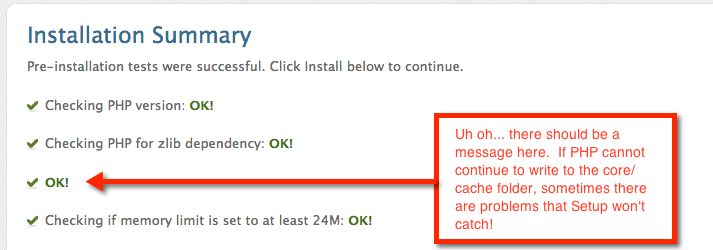
When that page is working correctly, you should see messages next to each "Ok":
Check your Database Encoding
It can be hugely problematic if your database on one server does not use the same encoding as the new server. Things like single-quotes etc. will get broken, and in some cases, you might even get a 500 error when trying to view your site.
Final thoughts
It would be wise to keep backups from the old server until the new site has undergone a couple of backup generations and everything has been verified.
If you run into trouble after successfully running Setup, try manually deleting all files in the core/cache directory and clearing your browser cache and cookies.
Your site should now be up and running in its new location!
Final Checkup It's common for there to be problems during a site migration. There is a script available that will run tests on your MODX site to ensure that the configuration file is configured correctly. See the test_config.php script available as one of the MODX utility scripts here: https://github.com/craftsmancoding/modx_utils. It is quite old and since MODX 2.5.x some connectors don't exists anymore. If you need a better supported check, you could try the commercial SiteCheck package.
Support the team building MODX with a monthly donation.
The budget raised through OpenCollective is transparent, including payouts, and any contributor can apply to be paid for their work on MODX.
Backers
Budget
$248 per month—let's make that $500!
Learn more