Using Virtual Hosts
Last updated May 14th, 2019 | Page history | Improve this page | Report an issue
Support the team building MODX with a monthly donation.
The budget raised through OpenCollective is transparent, including payouts, and any contributor can apply to be paid for their work on MODX.
Backers
Budget
$248 per month—let's make that $500!
Learn moreThis tutorial will demonstrate how to use a Context to create and manage a separate subdomain in a single Revolution install. We're going to create a subdomain at dev.modx.com (of course, not really, but you get the idea).
Creating the Context
Navigate to System -> Contexts. Click Create New to create a new context. Give it a name of "dev" and click Save.
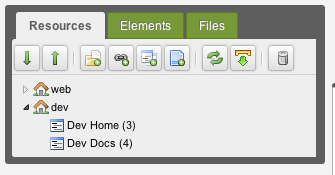
Next, in the Resource Tree (to the left) create a "Dev Home" Resource. Place it in the root of the "dev" context. Also, while you're at it, create a "Dev Docs" Resource as well with an alias of "documentation". We'll use this to test our context links.
Your tree should look something like this:

From there, go ahead and right-click on the "dev" Context in the tree, and click "Edit Context". From here we'll see a Context Settings tab. Click on it, and you'll need to add a few settings:
- base_url - Set this to "/" (no quotes) since we're making the root of the URL our base.
- http_host - Set this to dev.modxcms.com (or your subdomain name)
- site_start - Set this to the ID of your "Dev Home" resource.
- site_url - Set this to http://dev.modxcms.com/ (or your subdomain url). Don't forget the trailing slash. Remember this setting is: scheme + http_host + base_url
You can add other context-specific settings, such as error_page, unauthorized_page, cultureKey, and others if you so choose. All system settings can be overridden by setting them on a context.
Note: LINKING BETWEEN CONTEXTS If you're going to be linking back to the 'web' context from this context ('dev'), you'll want to add those same Context Settings (with 'web'-specific values, of course) to the 'web' context. This allows MODX to know where to redirect 'web' context URLs back to.
After creating the settings, clear your site cache.
Creating the Virtual Host
cPanel Users cPanel will make the necessary changes automatically when you create a new sub domain. Manually editing the Virtual Hosts is not recommended.
Now we need to do some Apache work. (If you're not using Apache, you can at least follow the same idea and customize it to your server.) Go to Apache's httpd.conf file, and add these lines, changing where necessary for your domain name:
NameVirtualHost dev.modxcms.com
<VirtualHost dev.modxcms.com>
  ServerAdmin [email protected]
  DocumentRoot /home/modxcms.com/public_html/dev
  ServerName dev.modxcms.com
  ErrorLog logs/devmodxcms-error_log
  TransferLog logs/devmodxcms-access_log
</VirtualHost>
Some Apache installs prefer you to put the IP address of the server in the VirtualHost and NameVirtualHost parameters - this is fine; the important field is the ServerName.
Obviously, if you're creating a different subdomain than dev.modxcms.com, you'd want to change these values.
Great! Restart your server (apachectl graceful).
The Subdomain Files
Now we're going to need to create the actual files to load the subdomain. Go create a "dev/" subdirectory in /home/modxcms.com/public_html/ (or whatever base path your webroot is in).
You'll need to copy 3 files from your MODX Revolution's root directory:
- index.php
- .htaccess
- config.core.php
Copy those to the dev/ directory.
Now, you'll need to edit them.
index.php
Edit index.php, and find this line (near the end):
$modx->initialize('web');
Change 'web' to 'dev'. Save the file and close.
.htaccess
You'll only need to edit one line here (and maybe not at all). Find this line (near the top):
RewriteBase /
Make sure that's set to /, not anything else. It should match the base_url context setting you set up earlier.
config.core.php
What is really important here is to make sure this line points to your MODX core folder:
define('MODX_CORE_PATH', dirname(__FILE__) . '/core/');
If the main domain is "up one level" on the filesystem, you should be able to use the following:
define('MODX_CORE_PATH', dirname(dirname(__FILE__)) . '/core/');
Final Steps
Clear your site cache again, refresh the Resource tree, and click 'Preview' on your "Dev Home" document. You should now be showing the page at the following URL:
Create a [[~135]] link to the "Dev Docs" Resource in the "Dev Home" Resource. Reload your page. Note the link properly builds to:
And you're done!
See Also
- Contexts
- Contexts as subfolders (from the forums: https://forums.modx.com/index.php/topic,51346.0.html)
Support the team building MODX with a monthly donation.
The budget raised through OpenCollective is transparent, including payouts, and any contributor can apply to be paid for their work on MODX.
Backers
Budget
$248 per month—let's make that $500!
Learn more


