Theme Creation Tutorial
Last updated not available | Page history | Improve this page | Report an issue
Support the team building MODX with a monthly donation.
The budget raised through OpenCollective is transparent, including payouts, and any contributor can apply to be paid for their work on MODX.
Backers
Budget
$248 per month—let's make that $500!
Learn moreOnce you have created a design you are happy with, it is straightforward to build a Theme to share. To start creating a theme, follow the steps below:
- Install Fred from MODX.com, the icon picker and TinyMCE RTE
- Set up a MODX Template with a content Dropzone
- Assign this Template to a Fred Theme
- Create Categories for your Fred Elements
- Create Fred Elements
Step 1: Install Fred
Fred is available as a transport package. In your MODX installation, go to Extras > Installer and click on the Download Extras button. Search to find bring up Fred.
You should also see other Extras listed made for Fred, such as a Font Awesome icon picker and a TinyMCE RTE. If you decide to add these also, follow their setup instructions.
After your Fred Extras finish downloading, install them from the Packages grid.
Step 2: Set up a Template
Fred needs a “dropzone” to know where content can go, indicated by adding a data-fred-dropzone attribute to an HTML entity, often a div tag. For example, where the [[*content]] tag would normally be in a Template, add the following:
<div data-fred-dropzone="content">
    [[*content]]
</div>
Note the value of the data-fred-dropzone="content" attribute indicates where to render your content once you save a page in Fred, in this case, the [[*content]]. Fred also supports multiple Dropzones; see the templates documentation for more information.
Step 3: Assign a Template to a Fred Theme
- In the MODX Manager, go to the
Extrasmenu >Fred>Themestab and switch toThemed Templatessidebar - Click the
Assign Theme to a Templatebutton - Select all Templates you wish to use with this Fred Theme
- Select the
DefaultTheme - Click the
Savebutton
In the Manager, Resources that use Templates assigned to a Fred Theme should have an "Open in Fred" button. From the front-end, you should see either three icons which launch Fred at the bottom-left of the page or a Fred sidebar.
Step 4: Create Categories for Elements
Fred organizes Elements using categories. Open the Elements Manager Page from the Extras > Fred > Elements menu, and switch to the Categories tab to create Categories. For example, your categories could look like this (create these for the purpose of this demo):
- Page Content
- Intros
- Text
- Images
- Testimonials
- …
Fred requires at least one Category before creating actual content Element.
Step 5: Create your first Elements
Fred Elements can be as simple as raw text or more complex like a responsive product catalog detail page. Let’s start by creating a simple heading Element, often the first thing on a page.
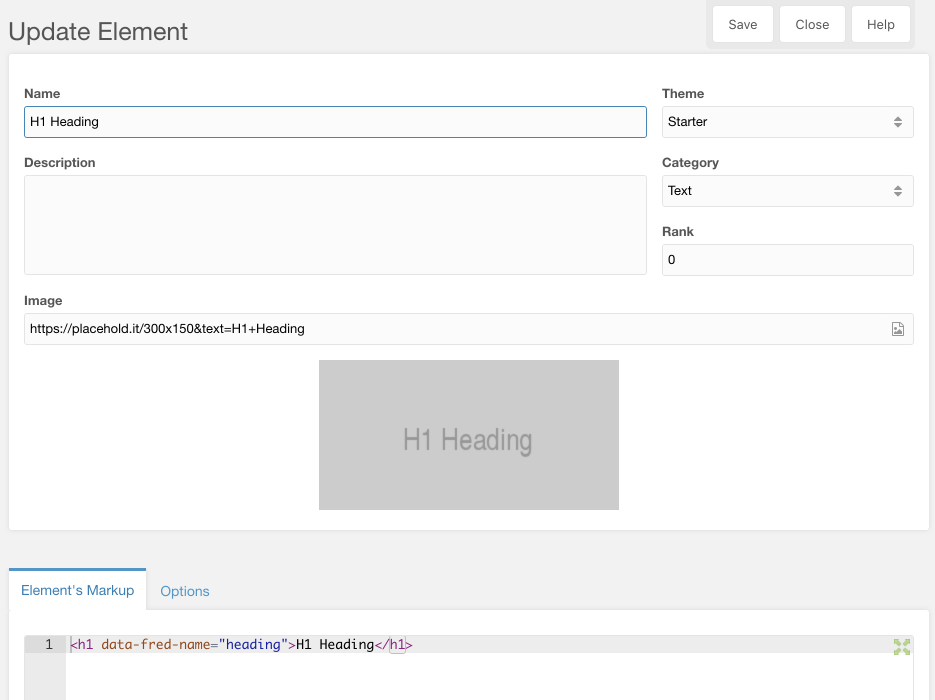
Switch to the Elements tab in Element’s CMP (Extras > Fred > Elements) and click the Create Element button. Fill the name (H1 Heading), category (Blocks), image (https://placehold.it/300x150&text=H1+Heading).
Add the following markup:
<h1 data-fred-name="heading">H1 Heading</h1>

Save this Element, go back to the front-end of your Resource, and refresh the page.
Click on the orange Elements stacked boxes icon or the MODX icon in the launcher at the bottom left of the page. In the sidebar Elements tab, you should now see the categories you created earlier in step 4. Hover the Text category to see your freshly created H1 Heading Element and drag it into the empty dropzone.
Congratulations, you just added your first Element to a page using Fred!
Select the placeholder “Hello, world.” text and start typing to edit its content. When hovering over an Element, you’ll see an additional toolbar that lets you duplicate, delete, or move the Element on your page. When you’re happy with the new page title, click the green checkbox button to save.
Let’s create another Element for a single paragraph:
- Create an Element under same category with the name
Basic Paragraph,https://placehold.it/600x150&text=A+paragraph+of+textfor the image, and<p data-fred-name="paragraph">Your content goes here…</p>for the markup - Save this in the Manager
- From the front-end, reload the page
- Drag this new Element beneath the previously created title, and drop it in place
- Change the text and save
Exporting a Theme
The Fred Manager Extra (aka, 3rd-party Component or 3PC) allows you share your themes with colleagues or to submit it to the MODX Extras repository:
- Click on the
Themestab. - Find the Theme you’d like to share/publish.
- Right-click on its name and choose the
Build themeoption. - Fill in the details and choose one of the two export options at the bottom.
A MODX Installer-ready theme will be saved to your core/packages/ directory as {{theme-name}}.transport.zip file that you can distribute. You can also choose to build and download, which will also save a copy to your downloads directory on your local computer.
Support the team building MODX with a monthly donation.
The budget raised through OpenCollective is transparent, including payouts, and any contributor can apply to be paid for their work on MODX.
Backers
Budget
$248 per month—let's make that $500!
Learn more


