Structure of the component


Last updated Dec 6th, 2019 | Page history | Improve this page | Report an issue
Support the team building MODX with a monthly donation.
The budget raised through OpenCollective is transparent, including payouts, and any contributor can apply to be paid for their work on MODX.
Backers


Budget
$248 per month—let's make that $500!
Learn moreAll decent additions to MODX are distributed by transport packages - these are such zip files with a certain structure.
During installation, they can perform various actions: create tables, change system settings, copy files, etc.
To write a transport package from scratch is very long, dreary and fraught with errors. It is much better to use a proven preparation modExtra - it is with its help that almost all of my additions are written.
Therefore, today we need to download modExtra from the repository and parse the structure of the future component: why are there so many files and directories?
Of course, we will also deal with the package builder - how it works and is configured.
Load modExtra
The workpiece lives in the repository on GitHub, so the easiest way is to take and clone it to your computer. There are at least 2 ways to do this:
- If you are not familiar with Git, or it is not yet installed on your computer - just download and unpack archive with files
- If you already have Git installed - we clone the repository:
git clone https://github.com/bezumkin/modExtra.git
and delete the ./modExtra/.git directory from it - we don’t need it.
Now we need to transfer files and directories to our project. It is located on your computer (in the last lesson we indicated the path to it), so you can simply copy files through Explorer. PhpStorm will see and index changes.
It should turn out like this:
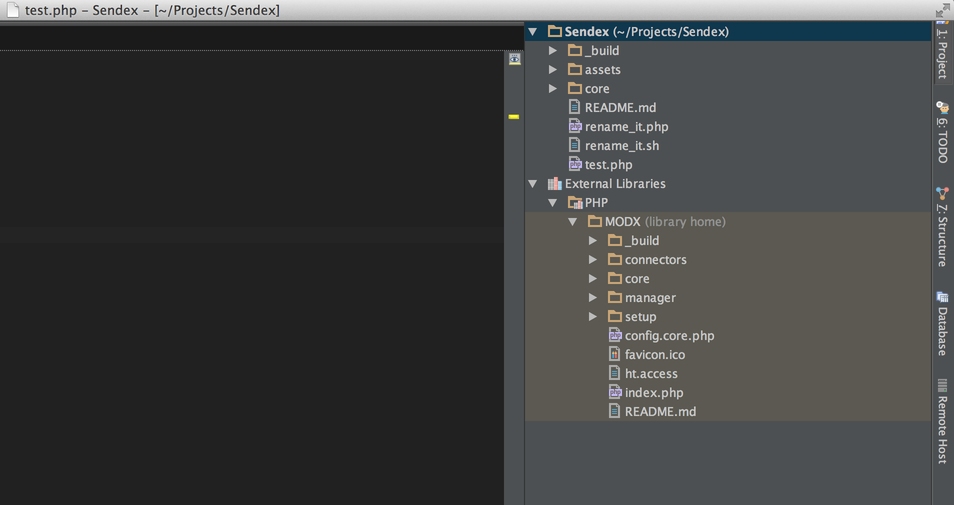
test.php can be safely removed.
Component structure
A regular package consists of 3 directories:
-
_build— scripts to build the component into the transport package -
assets— files that must be accessible from outside -
core— files that are needed for the internal logic of the component -
README.md— The file with the general description of the component is needed for the future repository on GitHub -
rename_it.php— new script rename billet php -
rename_it.sh— old script rename perl
Directory core
The most important component directory is the entire logic of its work.
This directory should be copied to the working site, so it looks like this:
- core
-- components
--- component_name
---- everything is necessary here
That is, the directory structure is such that it is copied to the correct place /core of the site.
Main directories
- controllers — files for the preparation of admin pages. Download the necessary scripts and styles.
- docs — change history, instruction and license. These files are involved in the package description.
-
elements — installable chunks, snippets and other possible inheritors of
modElement - lexicon — component dictionaries, usually only en and ru
- model — a directory with component objects and table models for databases, usually only for MySql. The main working class of the component is also located here.
- processors — files that perform some one small function. Serve, as a rule, for processing requests from the admin. Please note that files that are in this directory cannot be accessed from outside. That is, you cannot store any scripts here that you want to access from the browser.
These are kernel files, and in MODX the core directory can be moved out of the site altogether, or even use one core for several installations.
If you need to open something from the browser, there are assets for this.
Directory assets
Directory accessible from the browser for requests. Files are stored here *.js, *.css and php-connectors for their admin requests.
By default, the connector is only one; it is the one that the admin pages will access to perform some tasks. There is nothing special to tell here, everything is clear.
Directory _build
Probably the most interesting part of modExtra. Unlike standard MODX build scripts, everything in modExtra is very flexible.
Configuration
This is a service directory, it will not be in the final package, because it is her scripts that build the package.
-
data — list of snippets, chunks and other
modElementsto be installed - includes — support functions for the work of the collector
- properties — list of snippets properties. The base file name must match that of the snippet.
- resolvers — helper scripts that run on the destination site when the package is installed
At the root of the collector are special files.
Assembly file — build.transport.php. He connects the config build.config.php, in which the settings are stored:
- Component name
- Version
- Do I need to immediately install the component during assembly?
- Definition of working directories
- Setting objects to be installed
About the objects you need to tell more. In MODX Revolution, almost everything is an object: both chunks and snippets and templates. Objects have different properties for working in MODX. But during the installation of the package, we are not interested in the properties of these objects, but in how to install and update them.
Therefore, the transport package is essentially another special object. — modTransportVehicle and it has properties that describe how to install all chunks, snippets, and package templates.
In theory, in the installation script (build.transport.php) The behavior of all installed objects must be specified:
- Category to which the object belongs
- Its primary key to identify duplicates?
- What to do if such a key already exists: overwrite or not? (update chunks and snippets?)
- Properties of child objects (if any)
All this looks quite complicated and in fact - it is.
Therefore, I rewrote the installation scripts so that all the basic settings were made in build.config.php and the algorithm now works as follows:
- No need to climb into
build.transport.phpat all - Whether to pack an object is indicated by a constant declaration
BUILD_name_of_object_UPDATE - The object update is indicated in
BUILD_name_of_object_UPDATE - The static nature of the object is indicated in
BUILD_name_of_object_STATIC - Scripts that will be executed when the package is installed (resolvers) are specified in the array
$BUILD_RESOLVERS
Thus, all the work on configuring the package and adding deletes can be divided into 4 stages:
- We add the necessary objects in
_buildin/data/transport.objecttype.php(about it just below) - Specify how to install them in the config
- We add revolver in
_build/resolvers/resolve.anyname.php - Specify the name of the resolver in the config
Obviously, with such a collector structure, it will be very easy for us to include (or exclude) different objects in the package.
Installable Objects
Actually, this is our chunks, snippets, etc.
The files with the objects I have consist of an array and a loop that parses this array and returns already prepared objects. The logic here is simple: the unique values of the object are in the array, and the default values are added in the loop + the static settings of the elements from the config.
So here is a standard single-chunk array for modExtra:
$tmp = array(
    'tpl.modExtra.item' => array(
        'file' => 'item',   // File name in /core/components/имя/chunks/
        'description' => '',    // Description - will be visible in the corresponding field in the admin panel
    ),
);
Other objects are added in a similar way.
If you are at least familiar with php - there will be no questions, just look at the source.
All MODX elements can be assigned parameters - they will be visible on the corresponding tab when viewing an element.

The rule of good tone: always prescribe parameters to snippets, for the rest they are not really needed.
The build script looks for parameters for snippets in the directory _build/properties/. Files there are arranged according to the same principle - an array with unique values, and a loop with default values.
Auxiliary scripts (resolvers)
These are such special files that are performed during various actions with the package: installation, updating and uninstalling.
Resolver files are in _build/resolvers/ and look something like this:
if ($object->xpdo) {
    /* @var modX $modx */
    $modx =& $object->xpdo;

    switch ($options[xPDOTransport::PACKAGE_ACTION]) {
        case xPDOTransport::ACTION_INSTALL:
            // Actions on first package installation
            break;

        case xPDOTransport::ACTION_UPGRADE:
            // Actions when updating a package
            break;

        case xPDOTransport::ACTION_UNINSTALL:
            // What to do when removing a package
            break;
    }
}
return true;
Here you can do anything with the system on which the package is installed, even delete the entire site - because the modX class is available to you.
I remind you that active resolvers for assembly are indicated in $BUILD_RESOLVERS.
Conclusion
Perhaps something will be incomprehensible for the work of the collector, but we still have to sort out with him when we pack the finished code.
The main thing to remember is that there is a universal set of scripts that will collect everything we want into a transport package.
In the next lesson, we will upload modExtra to the server, rename it to Sendex, change it a bit, assemble it into a package and install it.
Support the team building MODX with a monthly donation.
The budget raised through OpenCollective is transparent, including payouts, and any contributor can apply to be paid for their work on MODX.
Backers
Budget
$248 per month—let's make that $500!
Learn more