Creating a Blog
Last updated Dec 6th, 2019 | Page history | Improve this page | Report an issue
Support the team building MODX with a monthly donation.
The budget raised through OpenCollective is transparent, including payouts, and any contributor can apply to be paid for their work on MODX.
Backers
Budget
$293 per month—let's make that $500!
Learn moreCreating a Blog
Creating a Blog is simple: just right-click on any node in the Resources tree on the left-hand side, and mouse over to the "Create" option. Then click on "Create Articles Here":

This will load a screen to create a Articles Container - which is basically a blog - that can contain any number of articles (blog posts) you want.
The First Tab
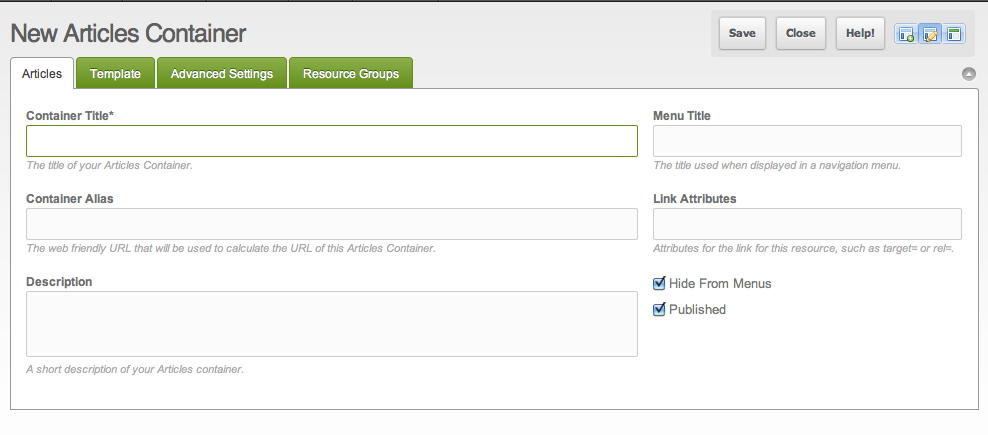
From there, you'll see a new editing screen that looks like this:

There are a few fields on the first tab that you can set:
- Container Title - Sets the title of your container, or your blog.
- Container Alias - This is the friendly URL name of the container. If you have this container in the site root, and set the alias to "blog", it would render as www.mysite.com/blog/
- Description - A short description of your blog.
- Menu Title - The title of your blog when it is being listed in a menu. This will default to the pagetitle if it's not set.
- Link Attributes - Any HTML link attributes to show in the menu link when the blog is displayed in a menu.
- Hide from Menus - If checked, your blog won't show up in any menus on your site.
- Published - When checked, your blog is published and live!
Go ahead and give your Articles Container a title called "My Blog", and an alias of "blog". Then click on the "Template" tab.
The Template Tab
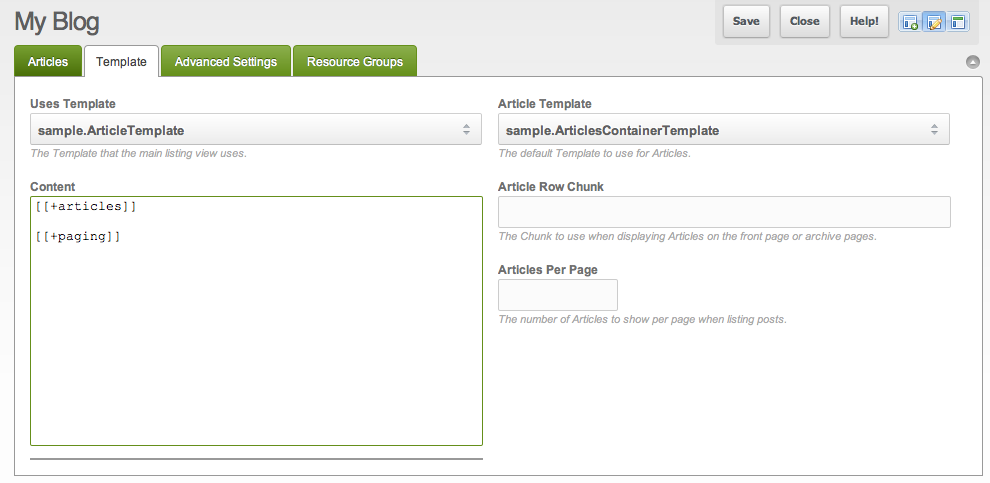
The Template tab consists of templating options for your blog, such as selecting the Template to use, and other listing options.

The fields for this tab are:
- Uses Template - The Template for your Blog. Articles provides a sample Template, but if you want to change this, you can.
-
Content - The "content" of the blog - here you can rearrange how the
[[*content]]field will render in your Articles Container Template. - Article Template - The default Template to select for your Articles (this can be overridden per article).
- Article Row Chunk - The Chunk to use when displaying posts on the front page or archive pages. This will default to a sample provided Chunk.
- Articles Per Page - The number of posts to show when listing posts on your blog. This will default to 10.
For now, you can keep the "Template" field selected to "sample.ArticlesContainerTemplate", and the "sample.ArticleTemplate" field selected to "sample.ArticleTemplate".
If you want to change the content of either of those Templates, it's highly recommended that you duplicate and rename them first. Any changes to the "sample" Templates will be overwritten if you upgrade Articles.
Note the "Content" field. Currently, it looks like this:
[[+articles]]

[[+paging]]
You can change this to restructure the positioning and markup of the posts as related to the pagination for the posts. You can also insert HTML markup here, and MODX tags.
Go ahead and click on the "Advanced Settings" tab.
The Advanced Settings Tab
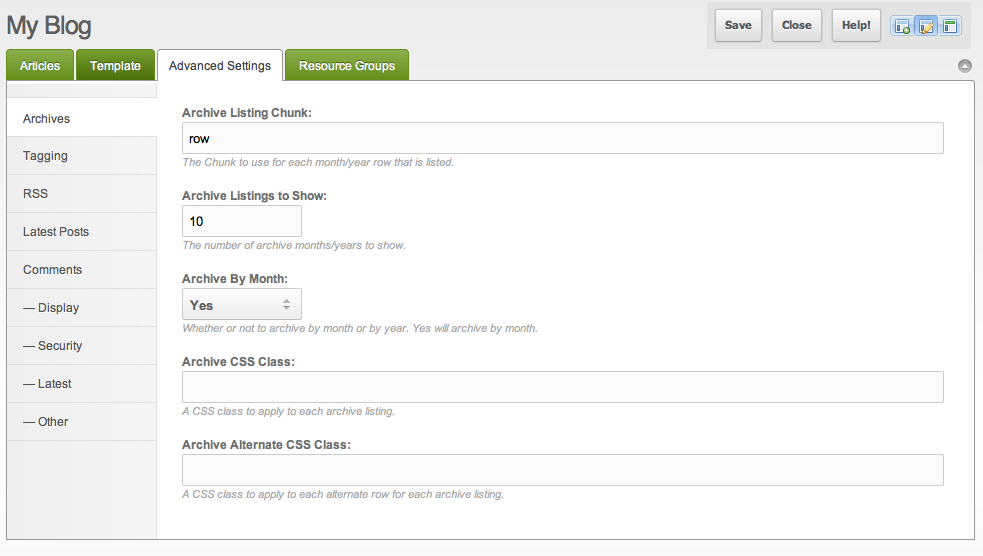
There are quite a few fields here, in separate vertical tabs:

- General Options
- Enable Update Services - If on, Articles will attempt to ping Ping-o-Matic whenever you publish an Article, to send out your article's title and URL to major search engines.
- Menu Index - This is the order of the resource in the tree. It is usually used for ordering purposes in displaying resources dynamically. You can also change this by drag/dropping the container in the left-hand tree.
- Sort Field - The field to sort by on the main and archives listing pages.
- Sort Direction - The direction to sort by on the main and archives listing pages (DESCending or ASCending).
- Include TVs in Listing - If on, will include TV values as options in the listing chunks.
- Include TVs List - An optional comma-delimited list of TemplateVar names to include explicitly if Include TVs is on. If you leave this blank, it will include all TVs attached to the Resource\'s Template.
- Process TVs in Listing - If on, will process the TV values in the listing chunks.
- Process TVs List - An optional comma-delimited list of TemplateVar names to include explicitly if Include TVs is on. If you leave this blank, it will process all TVs attached to the Resource\'s Template.
-
Other Listing Parameters - Any other properties you would like to add to the getResources/getPage call for the Articles listing page. Put them in MODX tag syntax, as if you were adding it to the tag call (eg,
&property=`value`).
- Pagination Options
- Articles Per Page - The number of Articles to show per page when listing posts.
- Pages Limit - The maximum number of pages to display when rendering paging controls
- Page Nav Tpl - Content representing a single page navigation control.
- Page Active Tpl - Content representing the current page navigation control.
- Page First Tpl - Content representing the first page navigation control.
- Page Last Tpl - Content representing the last page navigation control.
- Page Previous Tpl - Content representing the previous page navigation control.
- Page Next Tpl - Content representing the next page navigation control.
- Page Offset - The offset, or record position to start at within the collection for rendering results for the current page; should be calculated based on page variable set in Page Var Key.
- Page Var Key - The key of a property that indicates the current page.
- Total Var - The key of a placeholder that must contain the total records in the limitable collection being paged.
- Page Nav Var - The key of a placeholder to be set with the paging navigation controls.
- Archives Options
- Archive Listing Chunk - The Chunk to use for each month/year that is listed.
- Archive Listings to Show - The number of archive months/years to show.
- Archive By Month - Whether or not to archive by month or by year. Yes will archive by month.
- Archive CSS Class - A CSS class to apply to each archive listing.
- Archive Alternate CSS Class - A CSS class to apply to each alternate row for each archive listing.
- Group By Year - If set to 1, will group archive results by year into a nested list. If set to 1, this will ignore the Archive By Month setting.
- Group By Year Chunk - If Group By Year is set to 1, the Chunk to use for the wrapper for the archive list grouping.
- Tagging Options
- Tag Listing Chunk - The Chunk to use when displaying tags on the listing pages.
- Tag Listings to Show - The number of tags to show in the popular tags listing.
- Tag CSS Class - A CSS class to apply to each tag listing.
- Tag Alternate CSS Class - A CSS class to apply to each alternate row for each tag listing.
- RSS Options
- RSS Alias (Permalink) - The alias (permalink) for the RSS feed, appended to the blog URL. Can be a comma-separated list. For example, if you set this to "rssfeed.rss", your blog at mysite.com/blog/rssfeed.rss would show the RSS feed.
- Number of RSS Items - The number of latest RSS items to show on the RSS feed.
- RSS Feed Chunk - The Chunk to use for the RSS Feed template.
- RSS Item Chunk - The Chunk to use for each item in the RSS Feed.
- Latest Posts Options
- Latest Articles Chunk - The Chunk to use for each Latest Article.
- Latest Articles To Show - The number of latest Articles to show.
- Latest Articles Offset - The starting index of the listing of latest Articles.
- Notifications (not shown in screenshot - new as of Articles 1.4.1)
- Send to Twitter - If enabled, automatically posts to Twitter when Article is published.
- Twitter Consumer Key - Optional security key.
- Secret Twitter Consumer Key - Optional secret access token.
-
Twitter Template - The template to use for each tweet. Available placeholders are:
[[+title]][[+url]][[+hashtags]] - Twitter Template (hashtags) - If hashtags placeholder is used, this sets the maximum number of tags to include.
- URL Shortener - The service to use for shortening URLs. Can be set to blank for no shortening.
For more information on the Commenting settings, read up on the Quip documentation.
Again, if you plan to change any of the Chunks here, remember to duplicate them or select a different Chunk, rather than editing the "sample" ones, as they will be overwritten during upgrades.
See the the page on Theming Articles for how to display other information inside your templates.
Conclusion
Now click "Save", and you have a working Blog! You can then click "View" in the top right to preview your blog. From here on out, there will be a grid below the tabs on the blog editing screen where you can edit and create new Articles.
Support the team building MODX with a monthly donation.
The budget raised through OpenCollective is transparent, including payouts, and any contributor can apply to be paid for their work on MODX.
Backers
Budget
$293 per month—let's make that $500!
Learn more


